
전에 소개했던 「sd-1click-colab」은 매우 간단하고, 초심자에게 추천할만한 AI 일러스트 생성 방법입니다만, 제작자가 준비한 것 이외의 모델이나 LoRA를 사용할 때는 설정이 번거롭다는 단점이 있습니다.
sd-1click-colab 사용법
[2023년판] Stable Diffusion WebUI로 AI 미소녀 만드는 법「ChilloutMix」
이미지 생성 AI "Stable Diffusion"을 사용하여 화제의 AI 미소녀를 만드는 방법에 대해 정리합니다.Q : 어떤 이미지를 만들 수 있나요? A: 무엇이든 만들 수 있습니다. 기본적으로 불가능은 거의 없습니
doooob.tistory.com
그래서 이번에는 'AUTOMATIC1111'이 준비한 'maintained by Akaibu' 를 사용하여 Google Colaboratory에서 자신이 좋아하는 모델 데이터를 사용하는 방법을 정리했습니다!
AUTOMATIC1111은 "Stable Diffusion WebUI"의 개발자 이름입니다.
모델 데이터를 얻는 방법
이번에 사용하는 "FaceBombMix"의 모델 데이터는 Civitai에서 다운로드할 수 있습니다.
Civitai에서 "FaceBombMix"를 검색해 봅시다.
다만, Civitai는 회원가입을 해야 해서 번거로우니, 아래 링크에서 회원가입 없이 그냥 받겠습니다.
다른 다양한 모델을 받고 싶으시다면, Civitai 회원가입을 추천드립니다.
https://prompthero.com/ai-models/facebombmix-download
FaceBombMix에서는 VAE를 사용하는 것이 권장되므로, 아래 링크에서 다운로드합니다.
https://huggingface.co/hakurei/waifu-diffusion-v1-4/blob/main/vae/kl-f8-anime2.ckpt
vae/kl-f8-anime2.ckpt · hakurei/waifu-diffusion-v1-4 at main
Git LFS Details SHA256: df3c506e51b7ee1d7b5a6a2bb7142d47d488743c96aa778afb0f53a2cdc2d38d Pointer size: 134 Bytes Size of remote file: 405 MB Git Large File Storage (LFS) replaces large files with text pointers inside Git, while storing the file contents on
huggingface.co
이제 준비물이 갖춰졌네요~
Colab판의 기동 방법「AUTOMATIC1111」
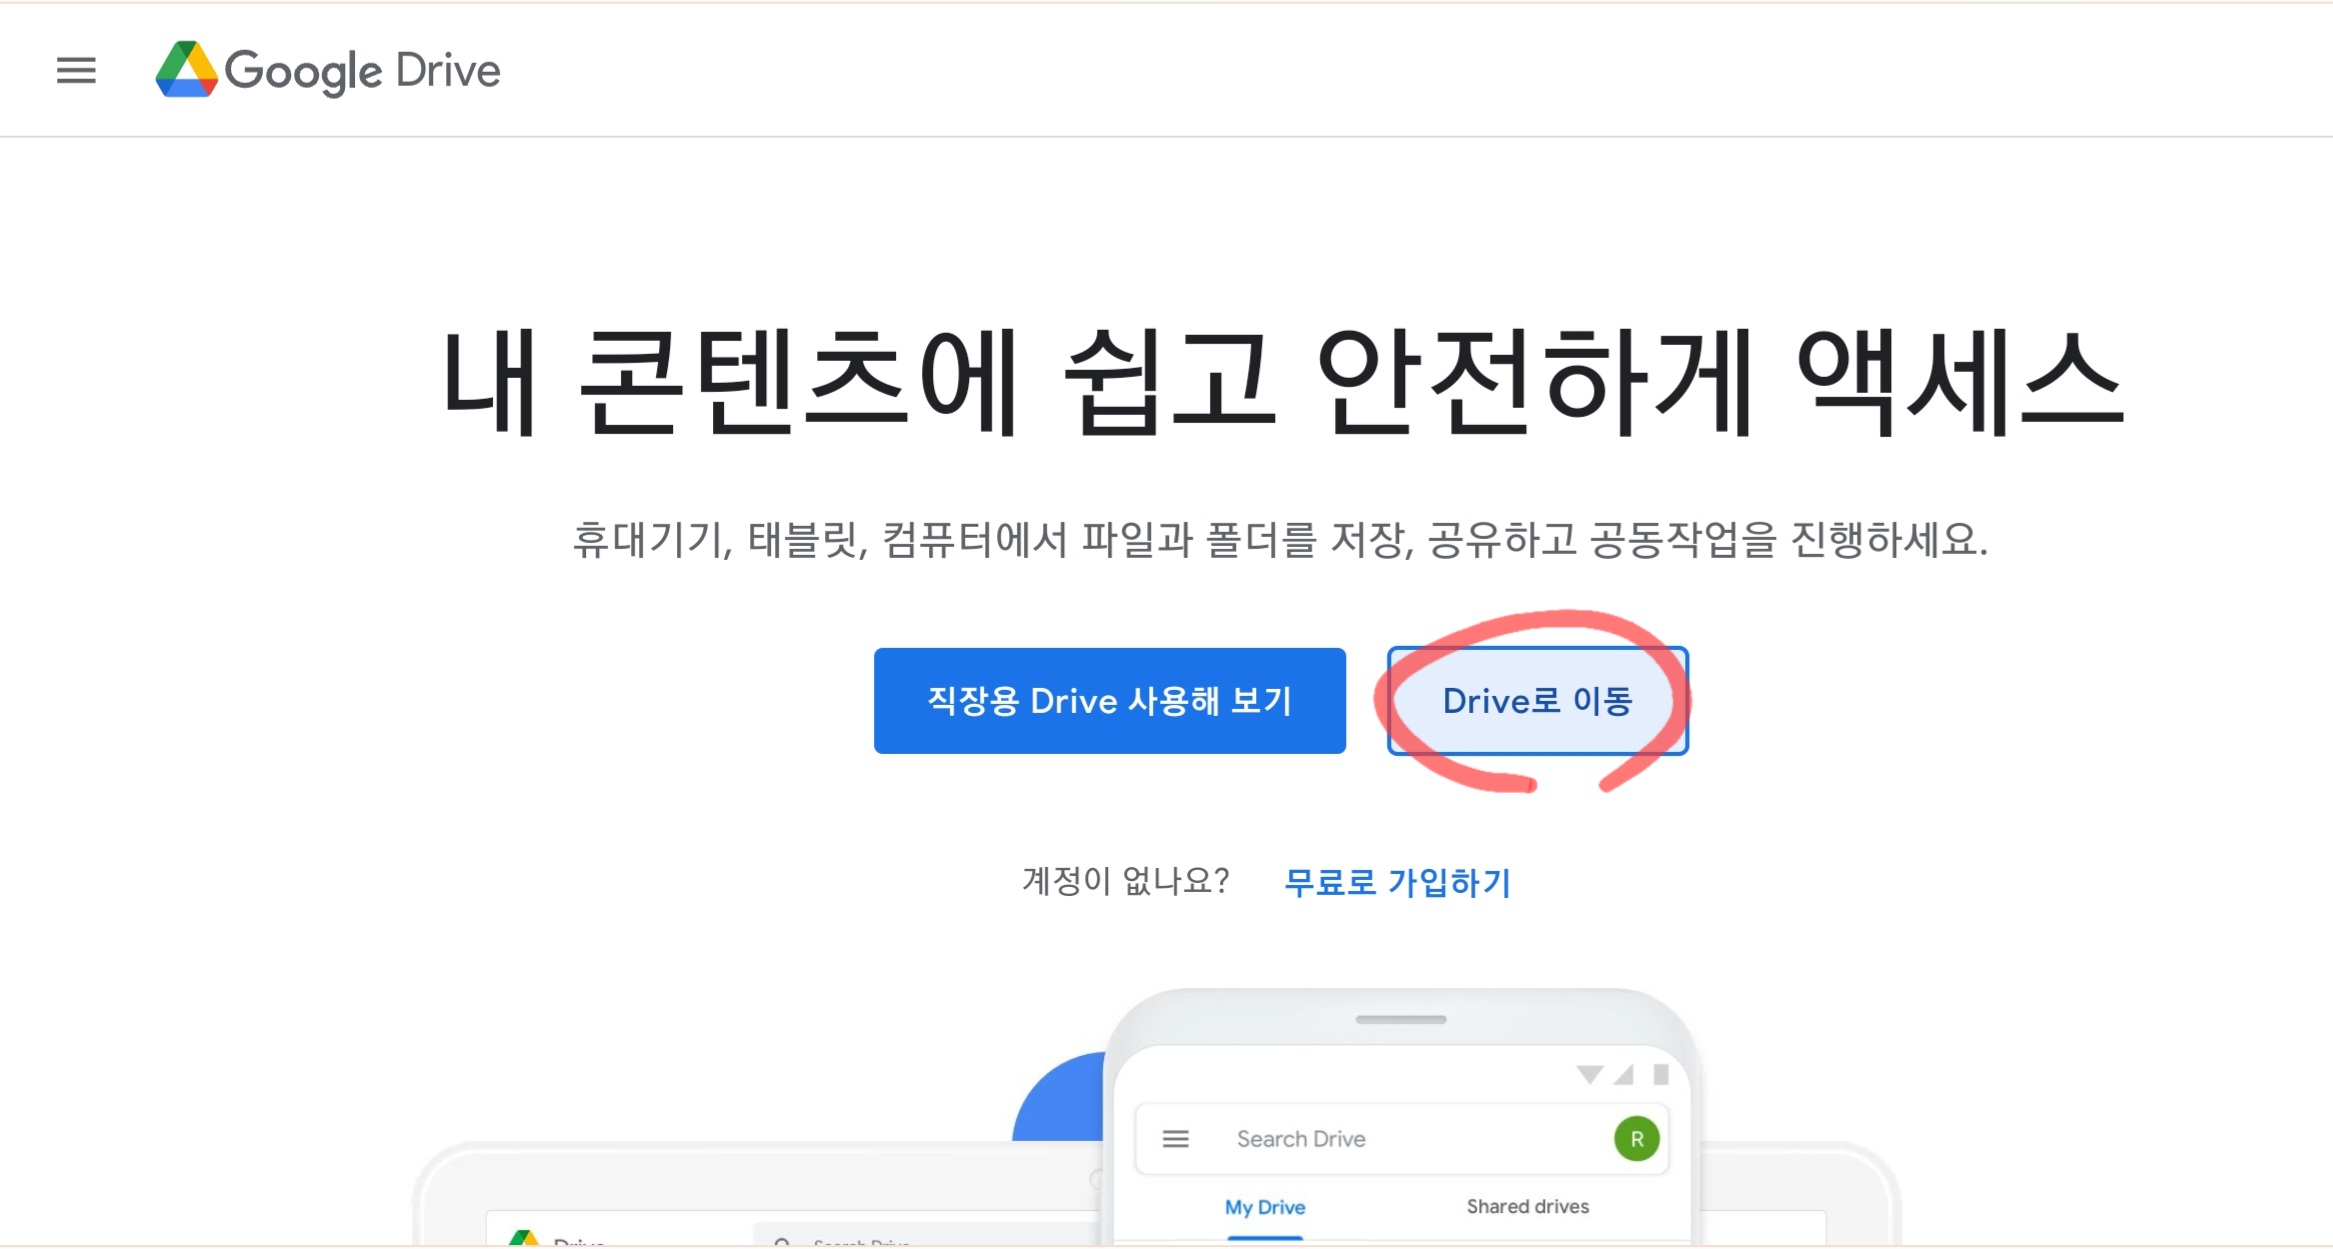
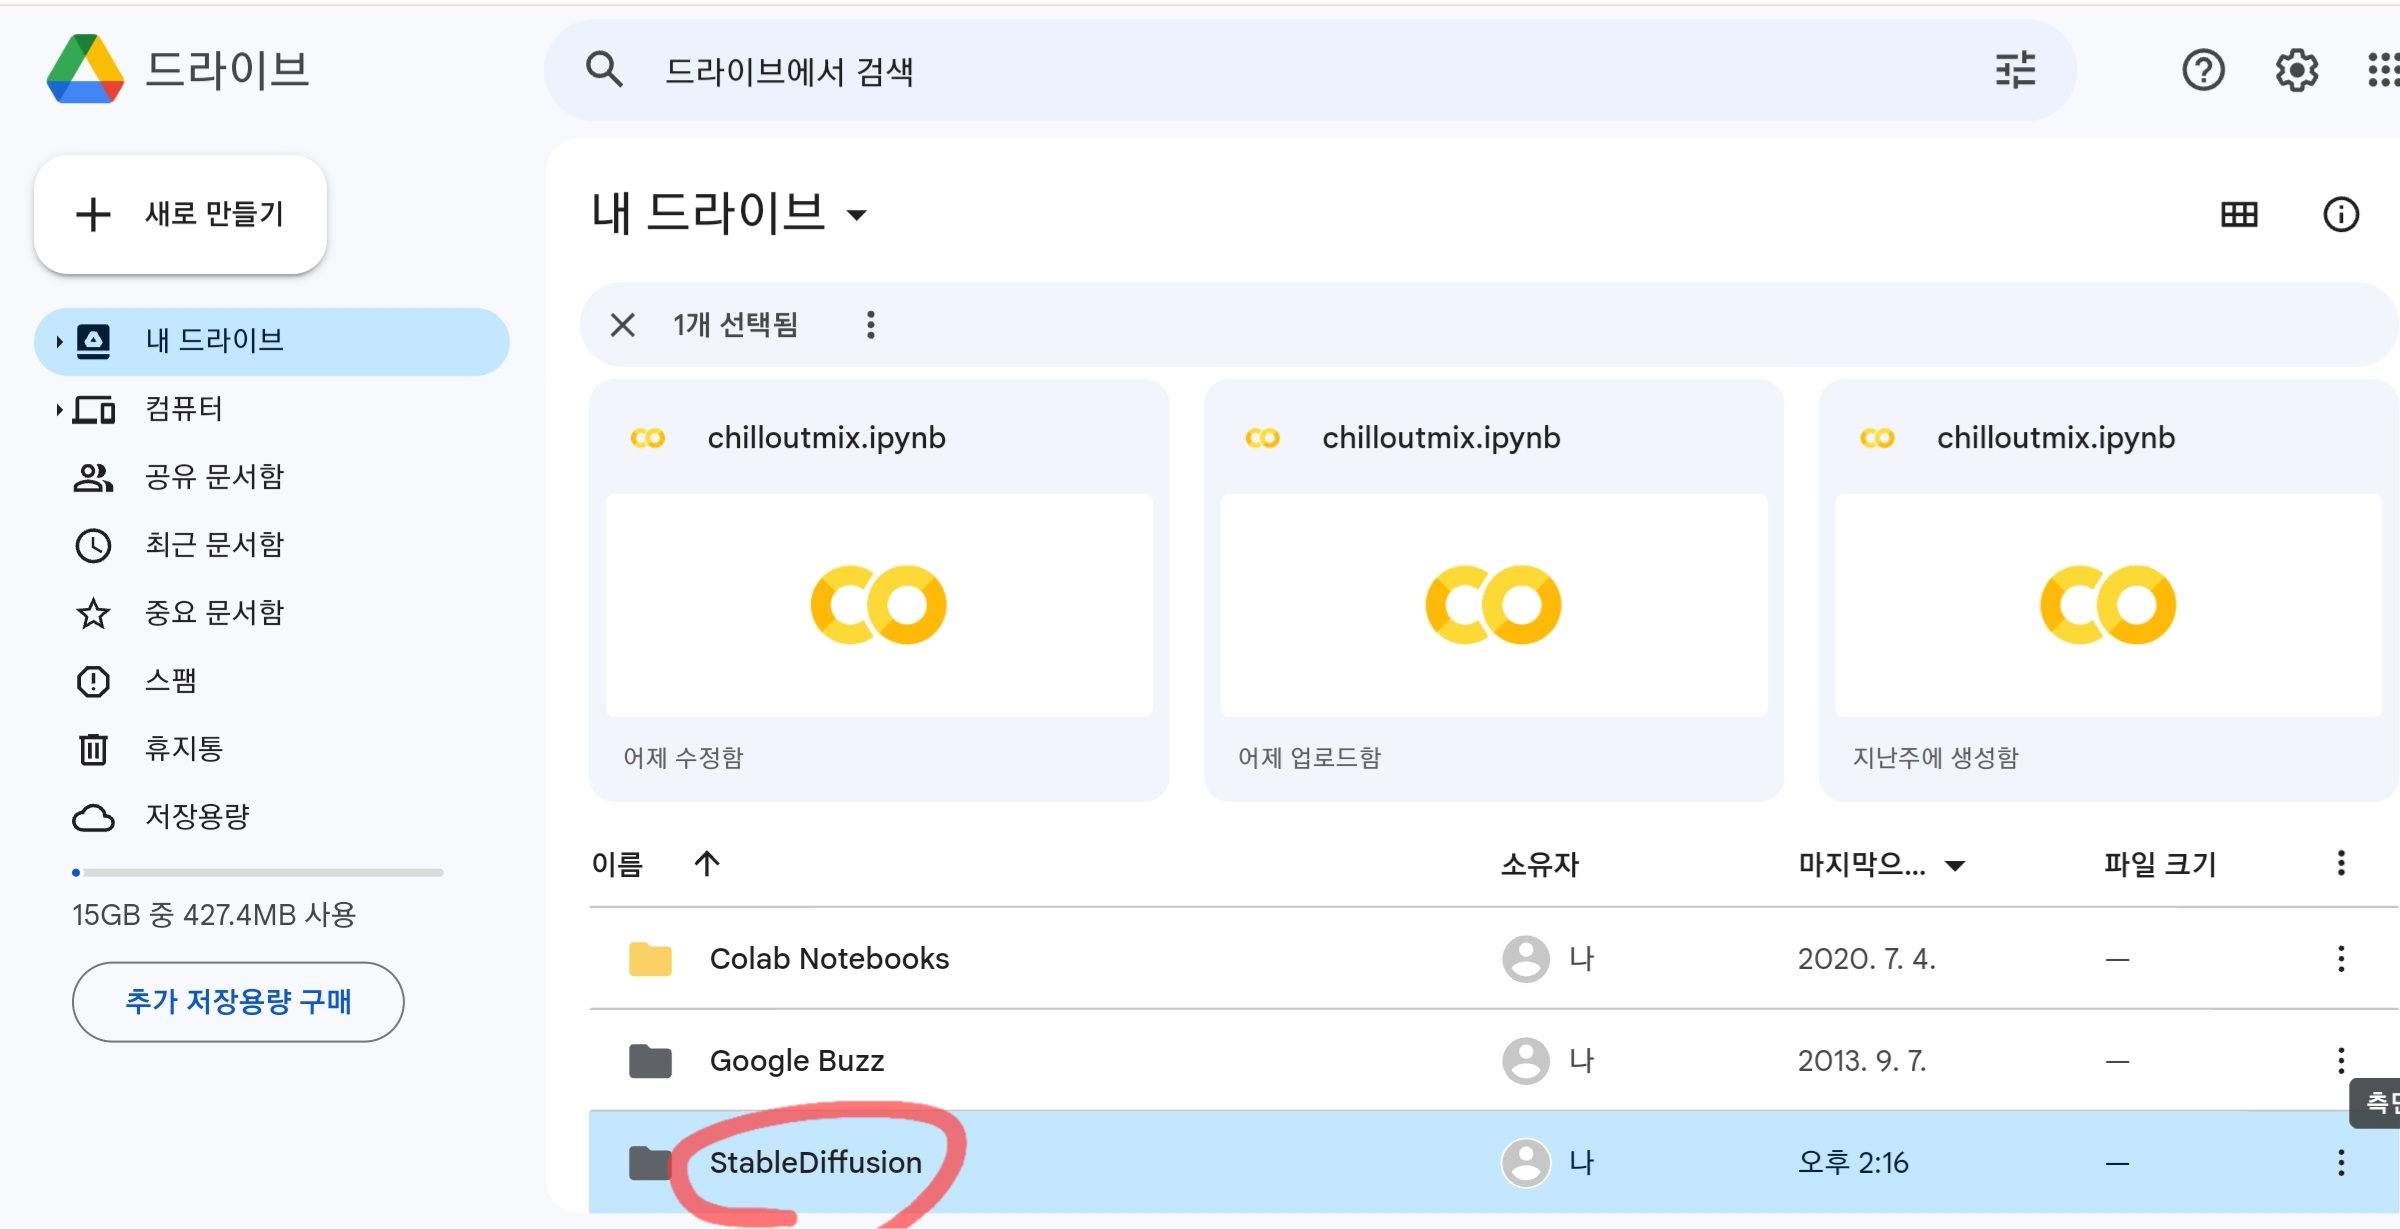
먼저 자신의 Google 드라이브를 열고
https://www.google.com/intl/ko_kr/drive/
'+새로 만들기'를 누르고
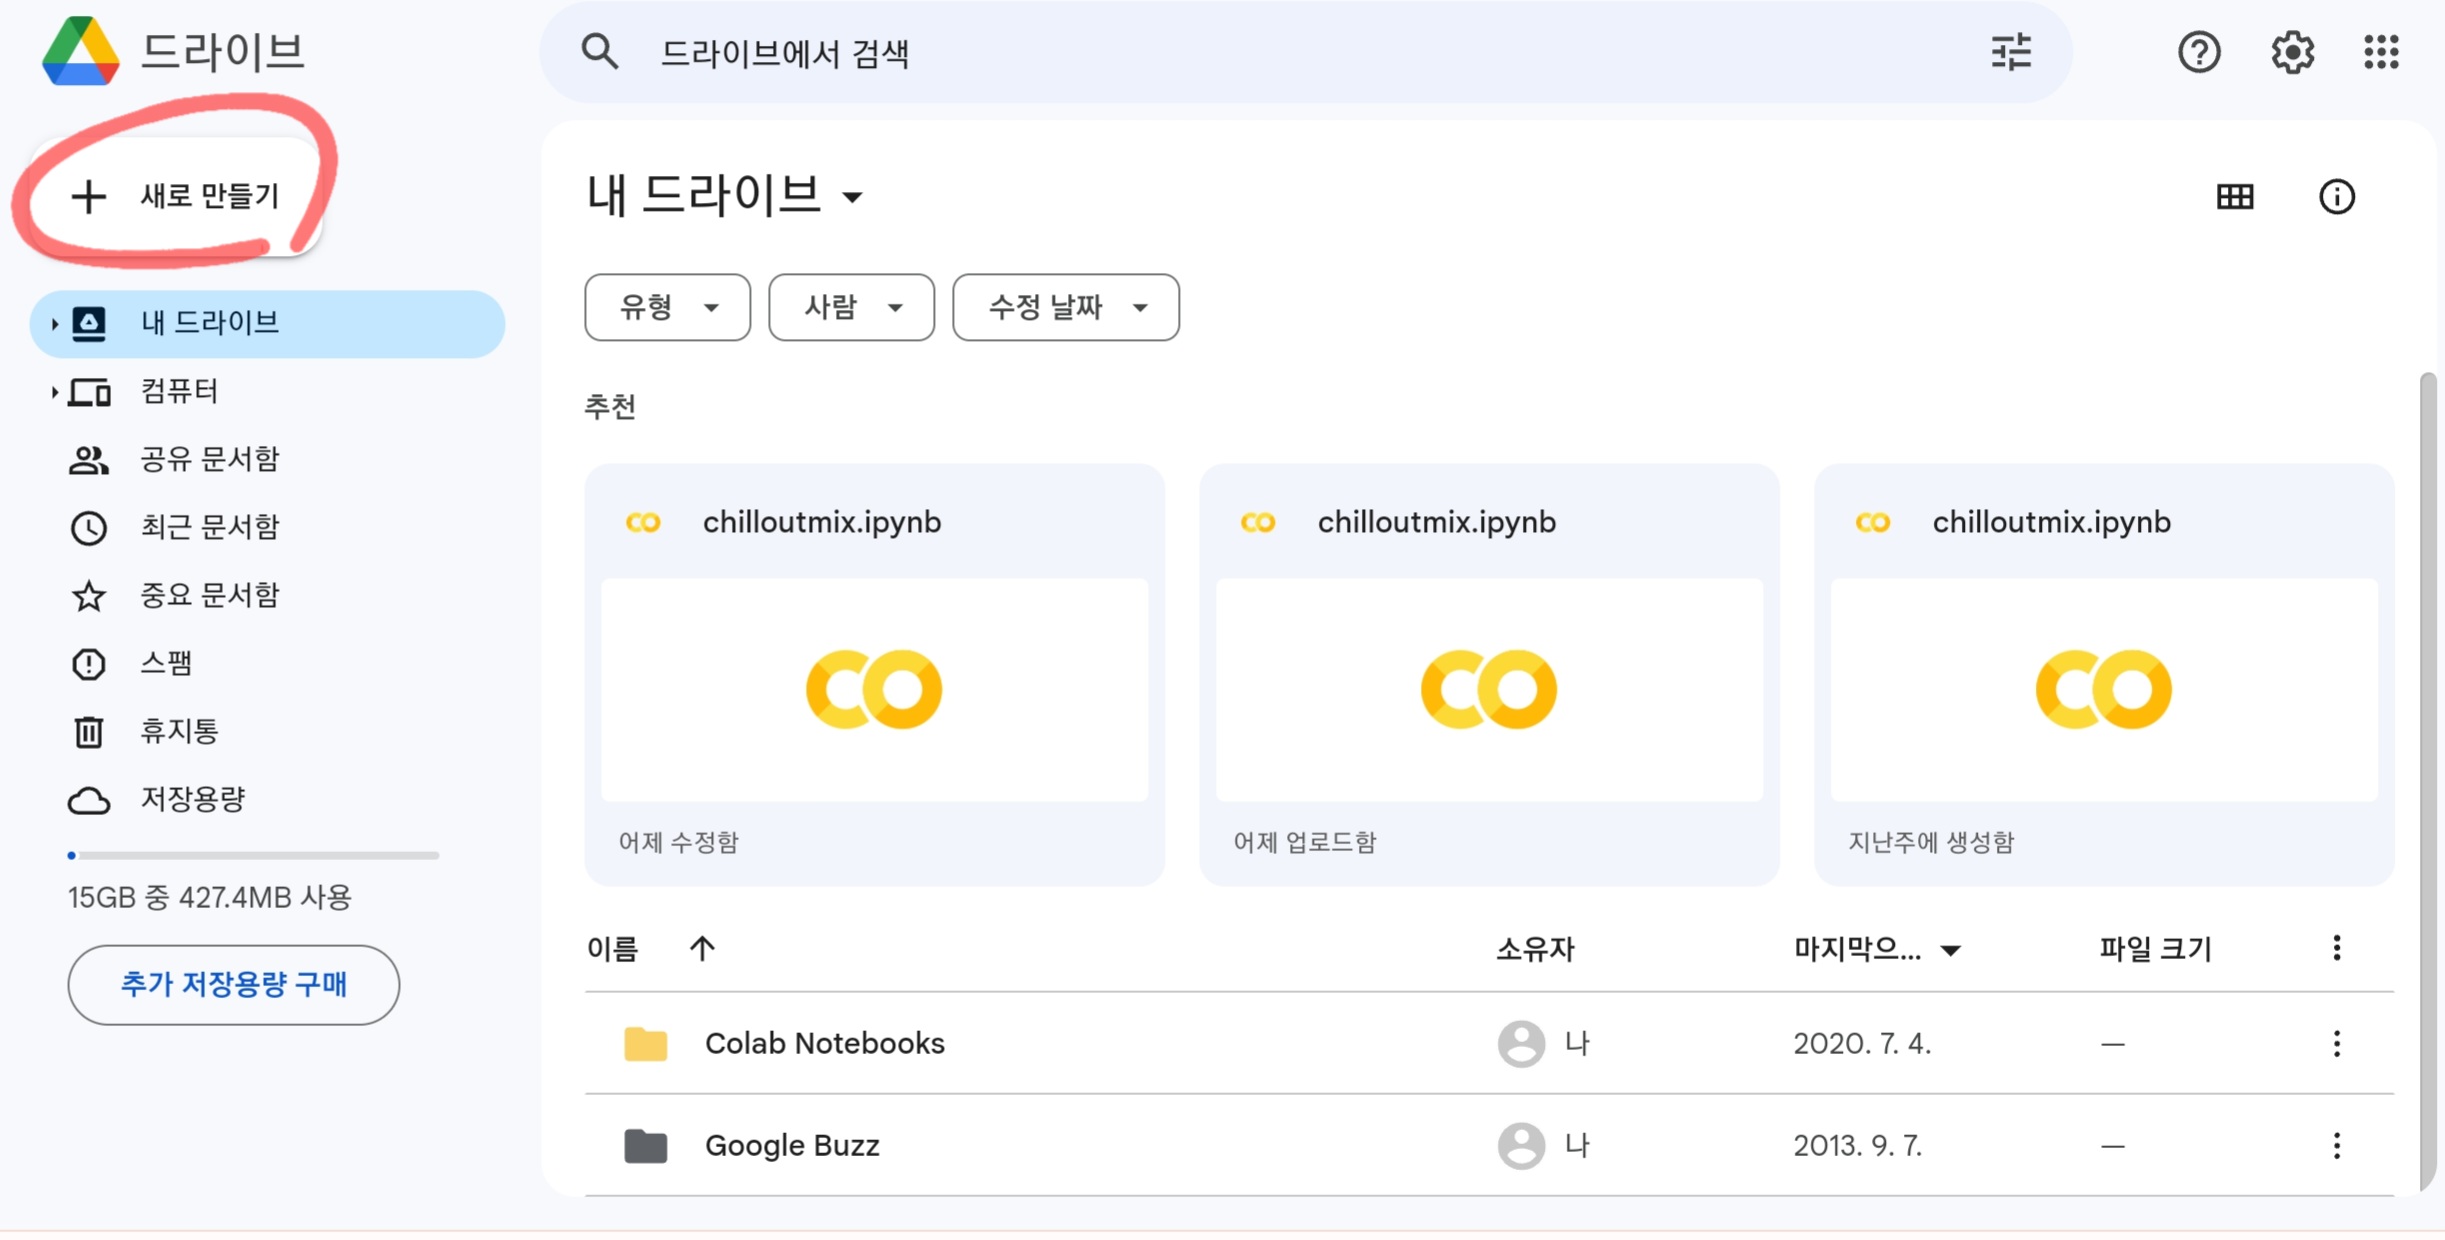
'새 폴더'를 선택해서
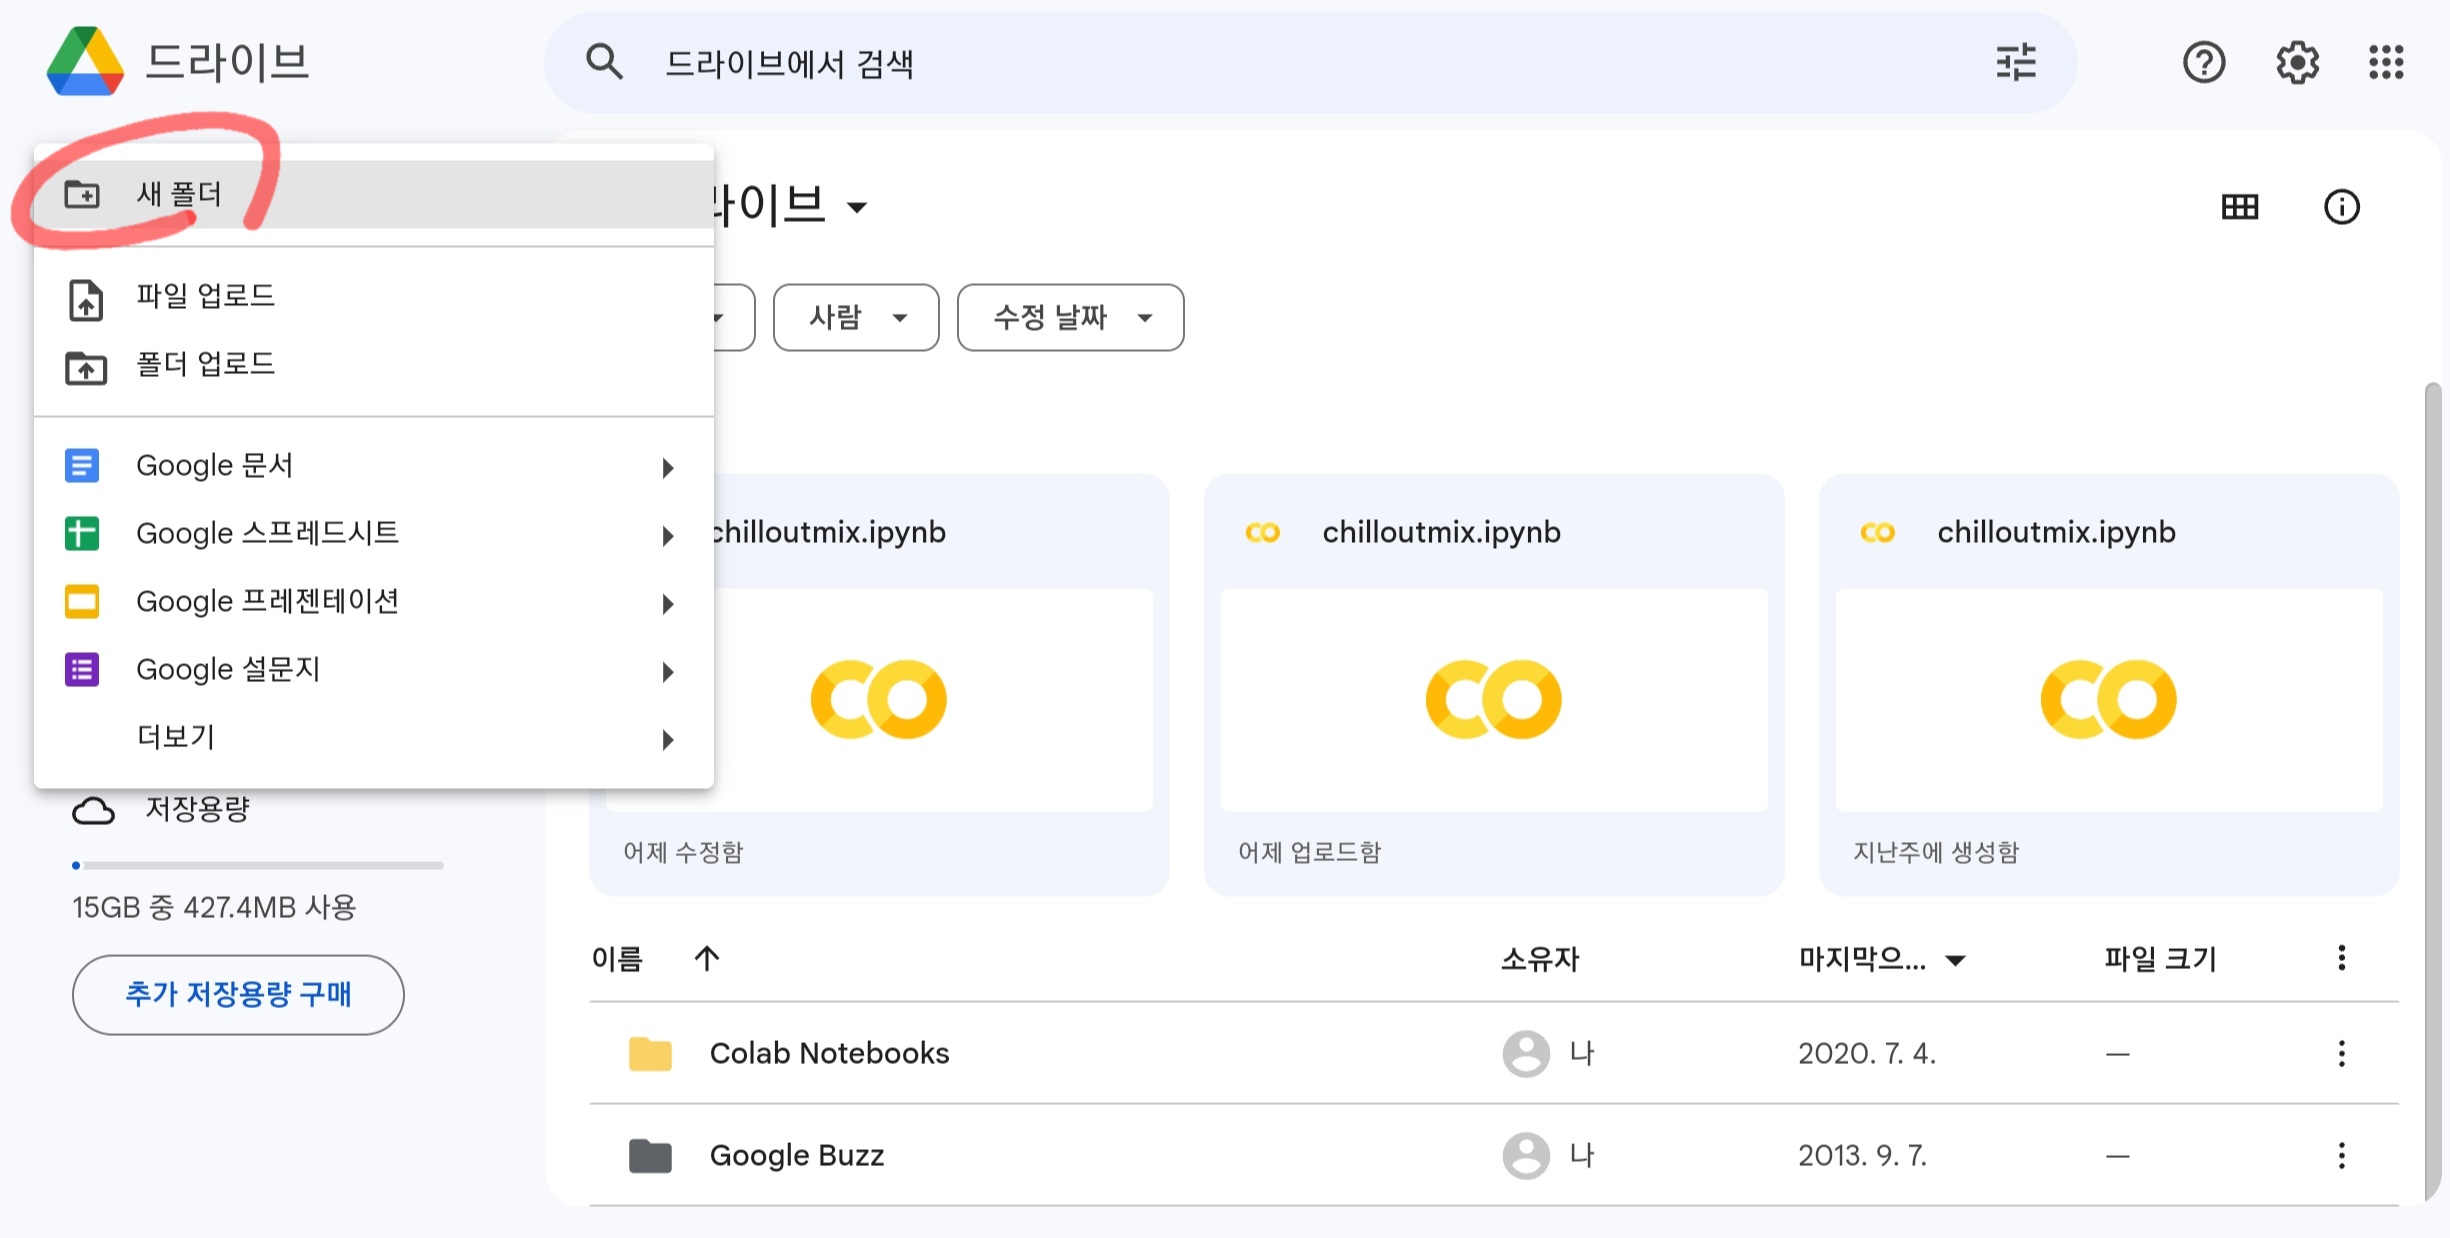
StableDiffusion 폴더를 만듭니다(중간에 공백 없이).
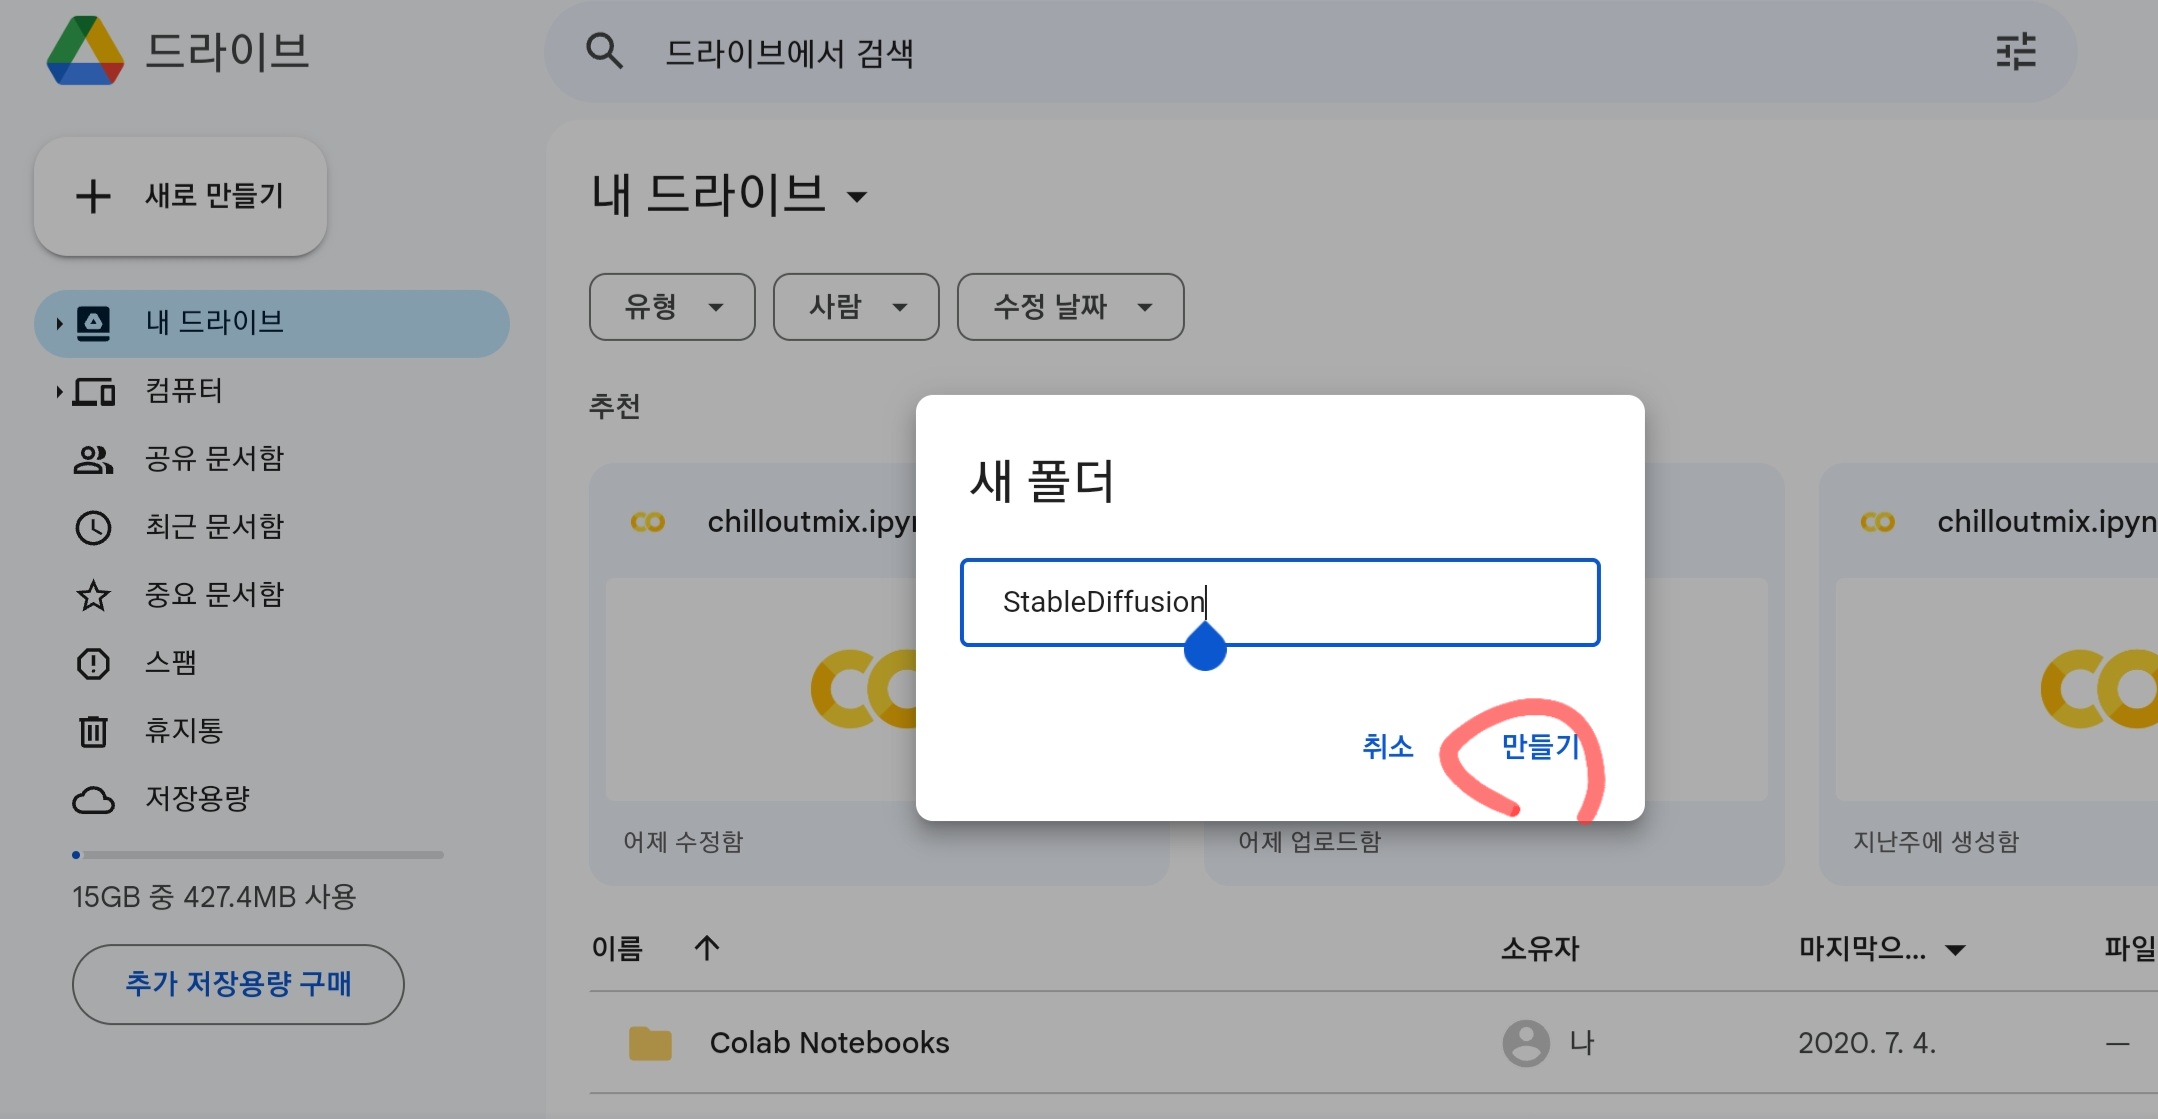
그리고 StableDiffusion 폴더를 선택하여 들어간 후
다시 '+새로 만들기' > '새 폴더'로 Model, VAE 폴더를 만들어 아래와 같이 구성합니다.
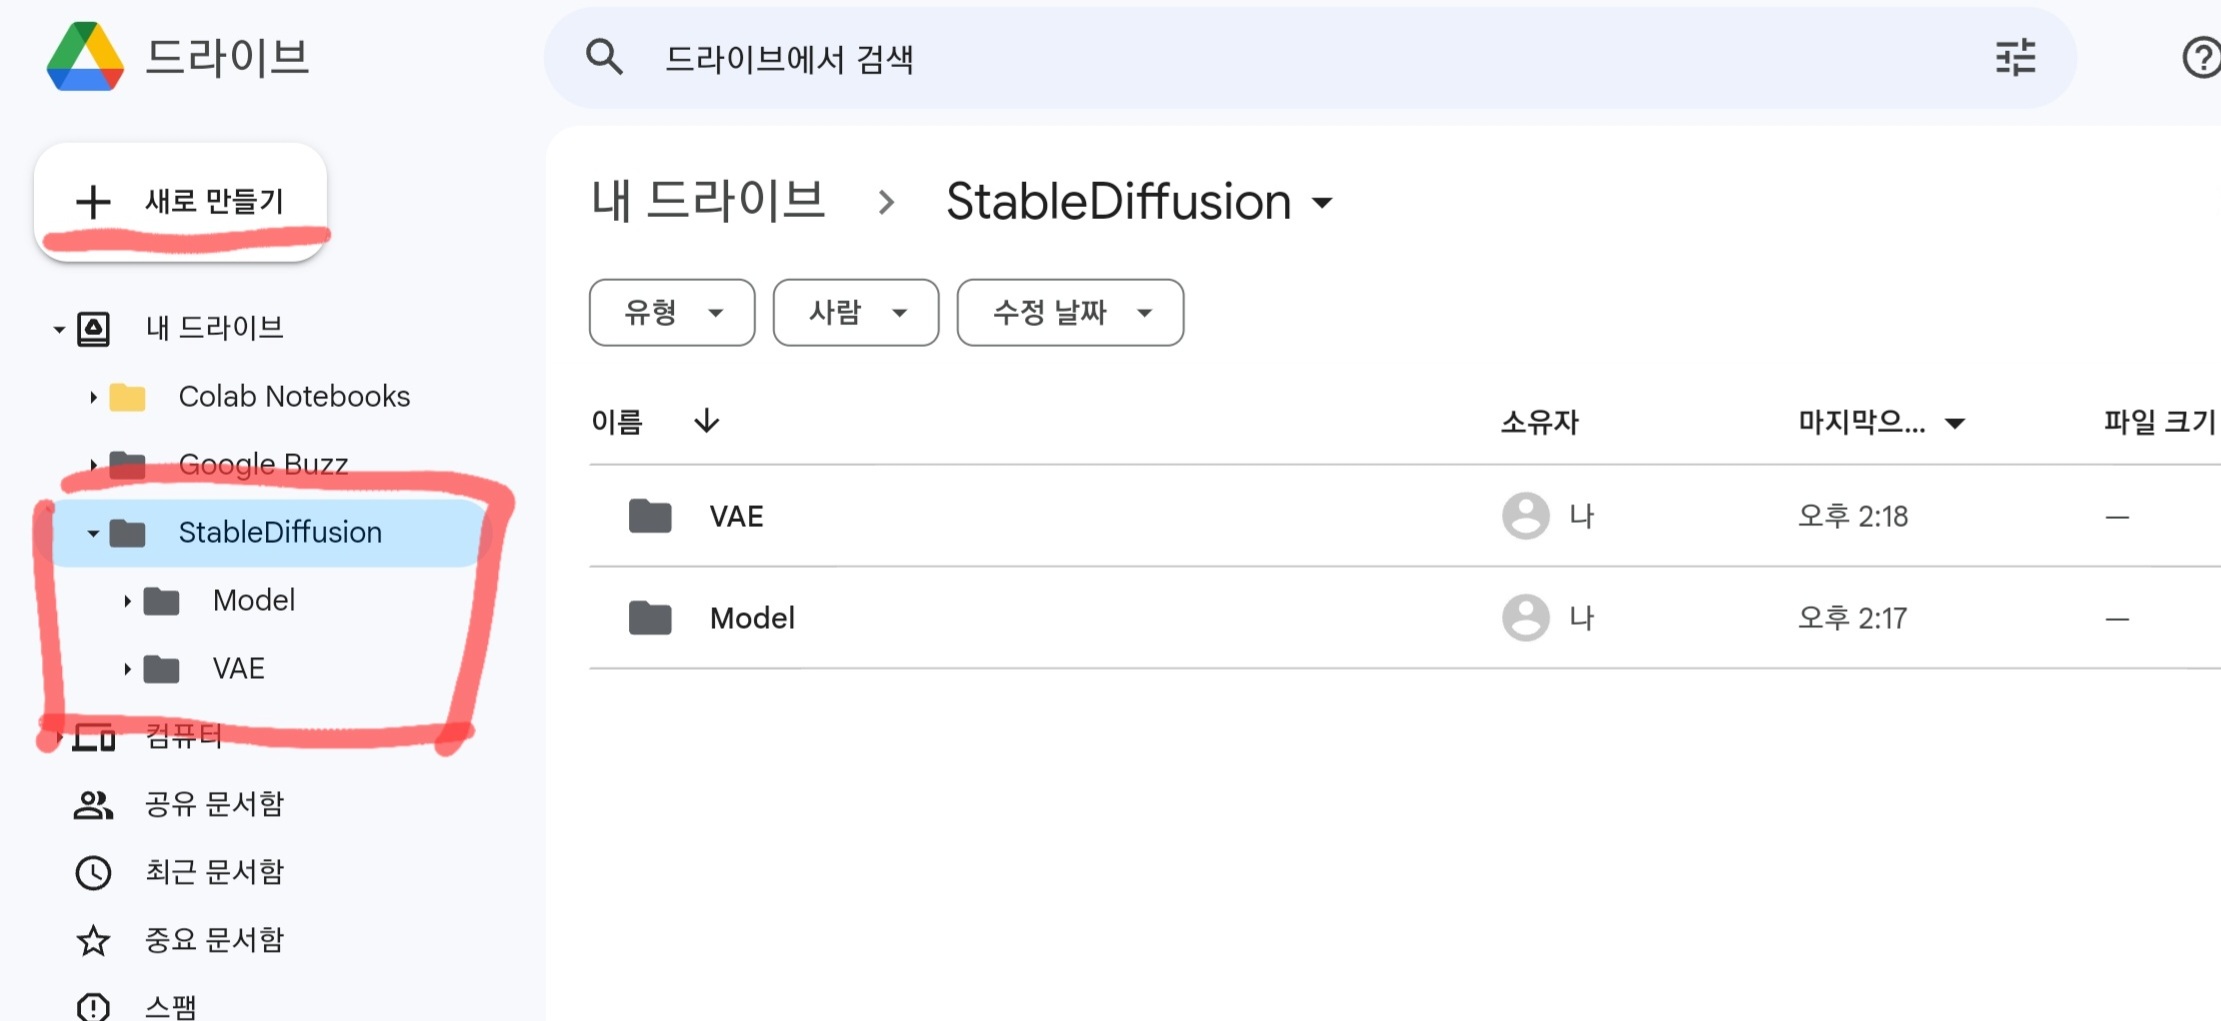
이제 Model 폴더에 FaceBombMix를,
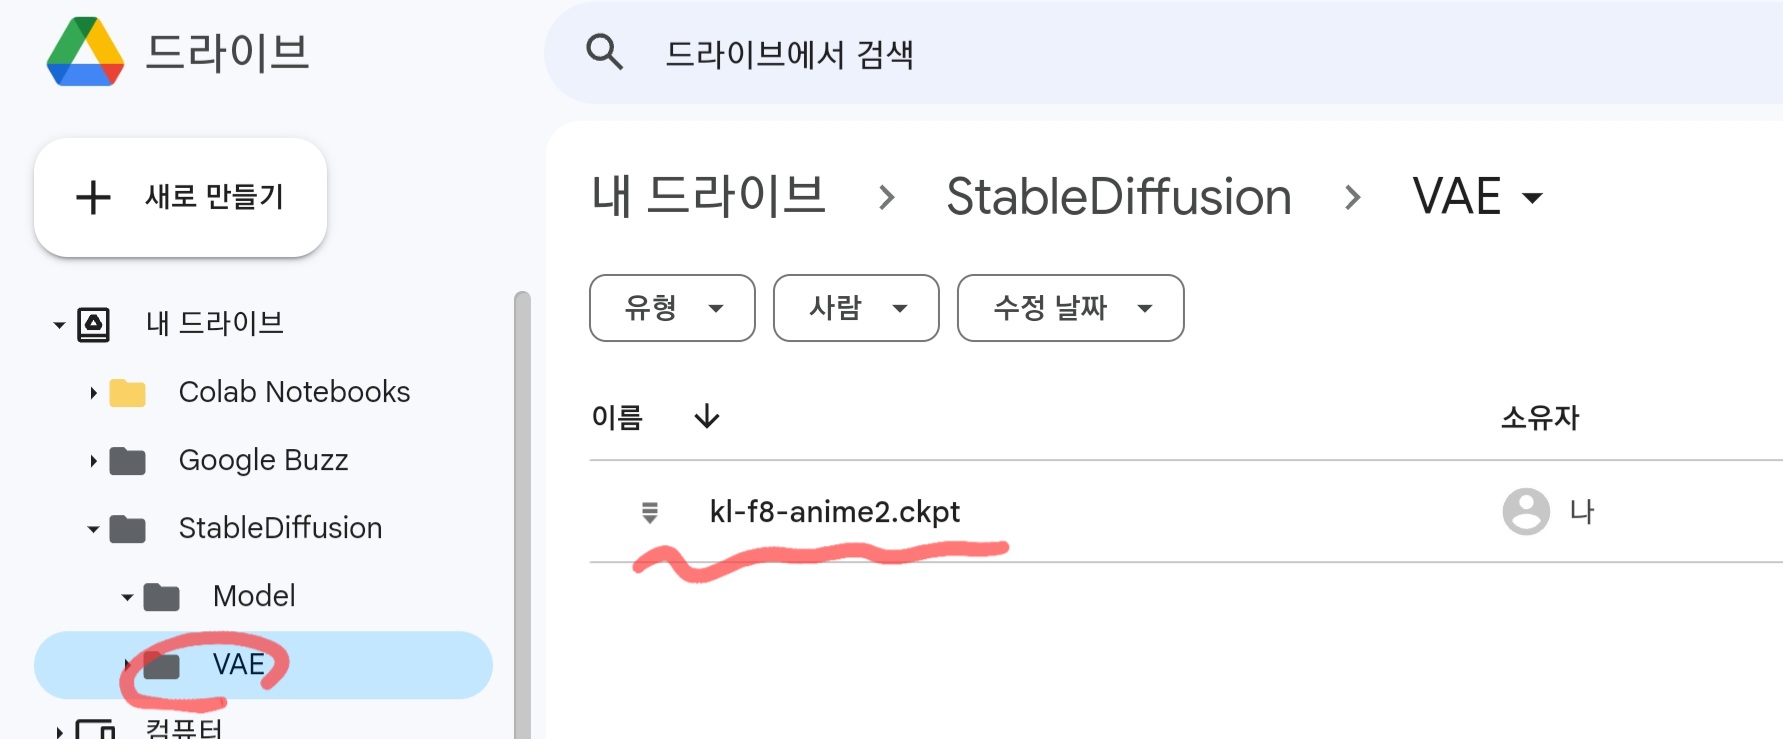
VAE의 폴더에 kl-f8-anime2.ckpt를 각각 업로드해 둡니다.
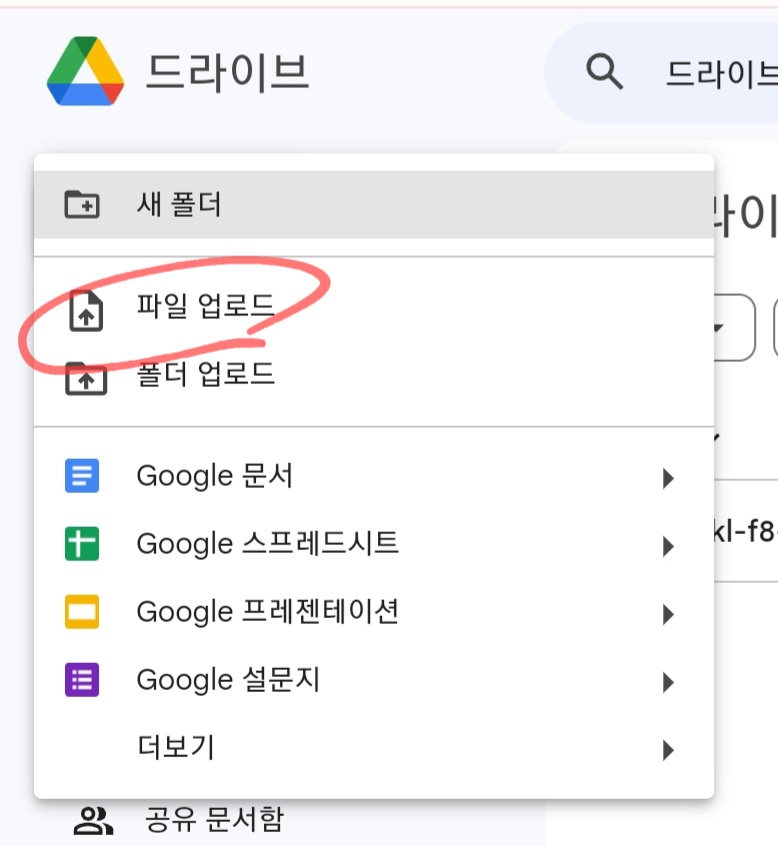
각 폴더에 들어가서 '+새로 만들기' > '파일 업로드' 를 눌러, 위에서 다운로드한 파일들을 아래와 같이 올려줍니다.

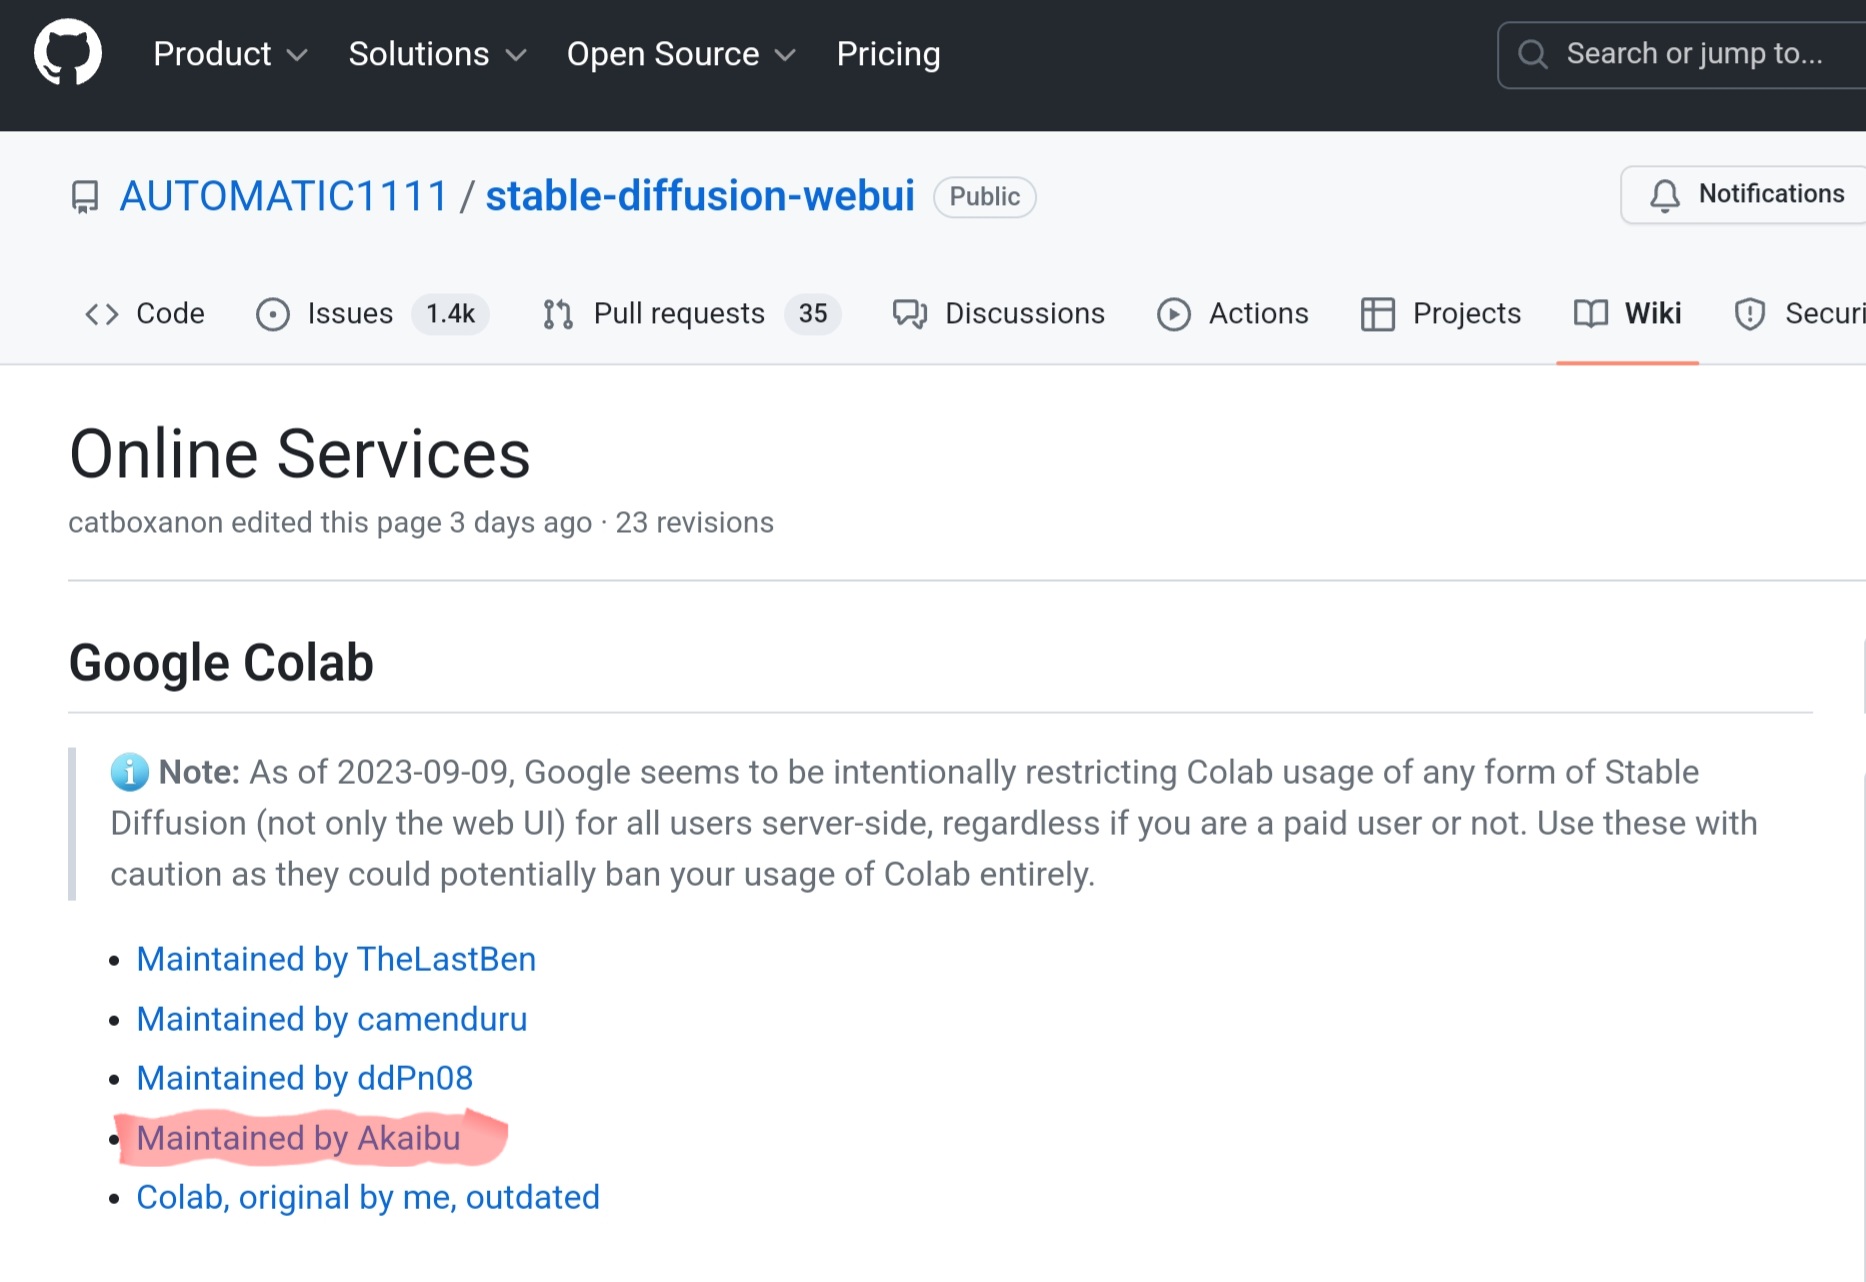
그런 다음 AUTOMATIC1111의 GitHub 페이지(아래 참조)로 이동하여 'Maintained by Akaibu'를 클릭합니다.
https://github.com/AUTOMATIC1111/stable-diffusion-webui/wiki/Online-Services
Online Services
Stable Diffusion web UI. Contribute to AUTOMATIC1111/stable-diffusion-webui development by creating an account on GitHub.
github.com
그러면 자동으로 Google 코랩 노트북이 열립니다.
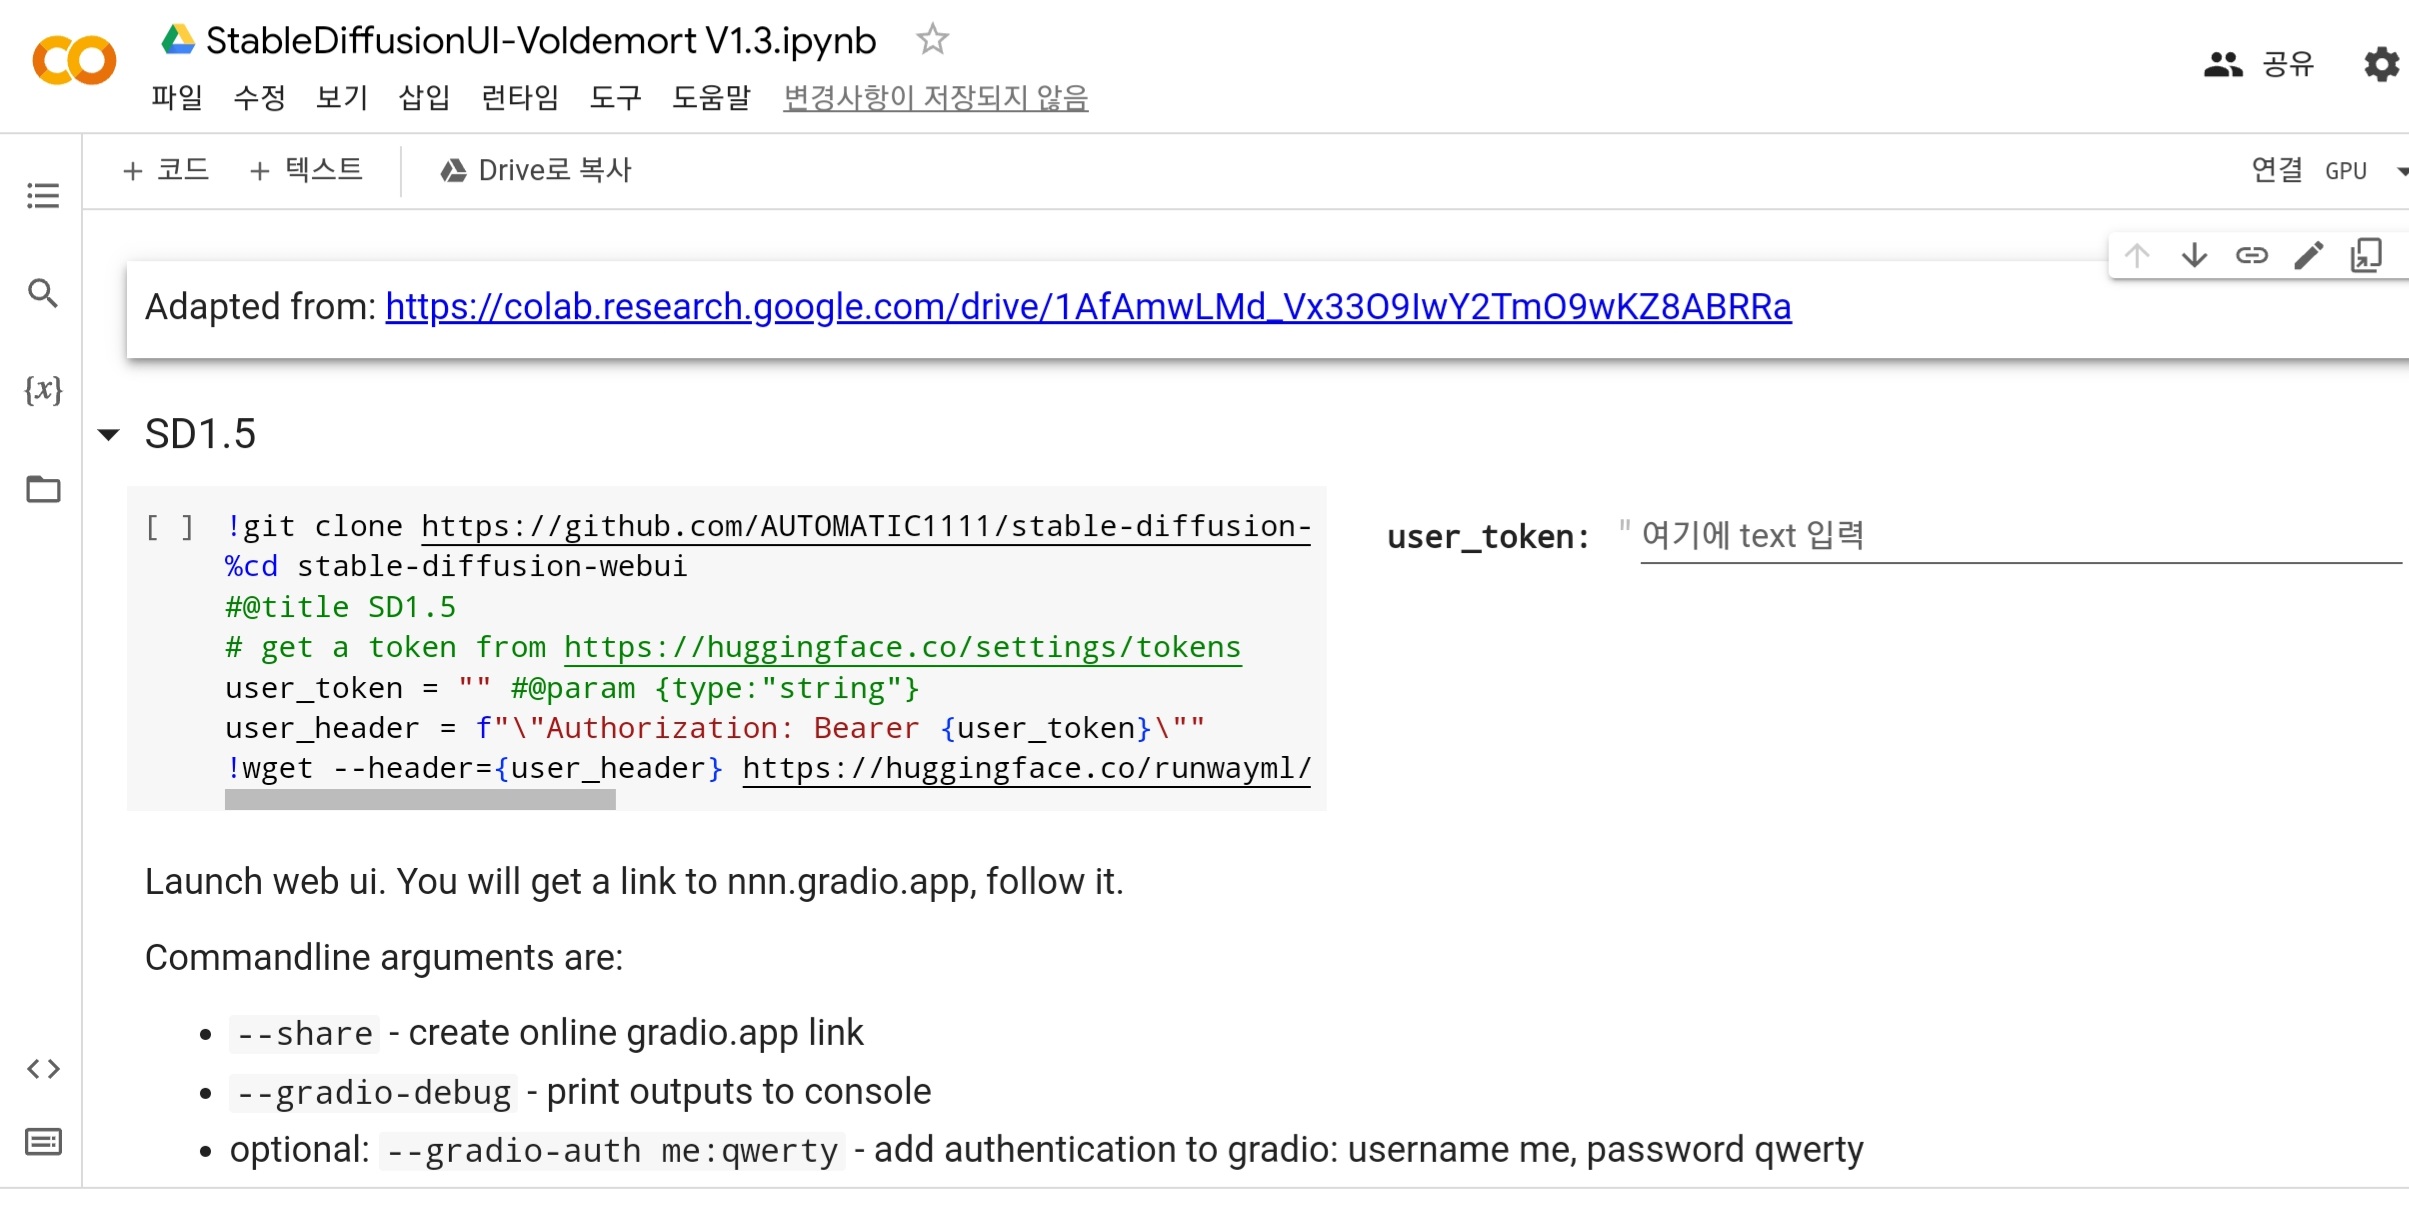
※덧붙여 그대로 이 노트북에 코드를 기술해도 상관없습니다만, 다시 기동 할 경우를 생각해, 「파일」→「드라이브에 사본 저장」으로, 노트북 자체를 내 드라이브에 따로 저장하고 편집하는 것이 좋습니다.
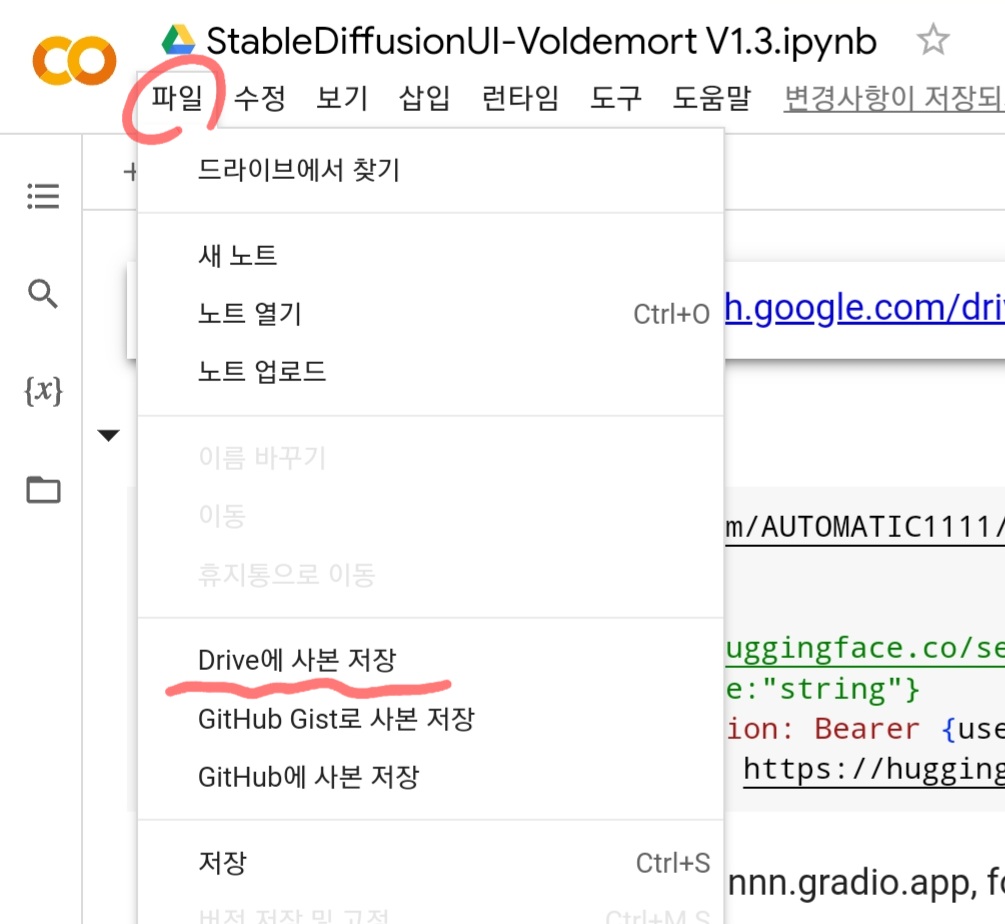
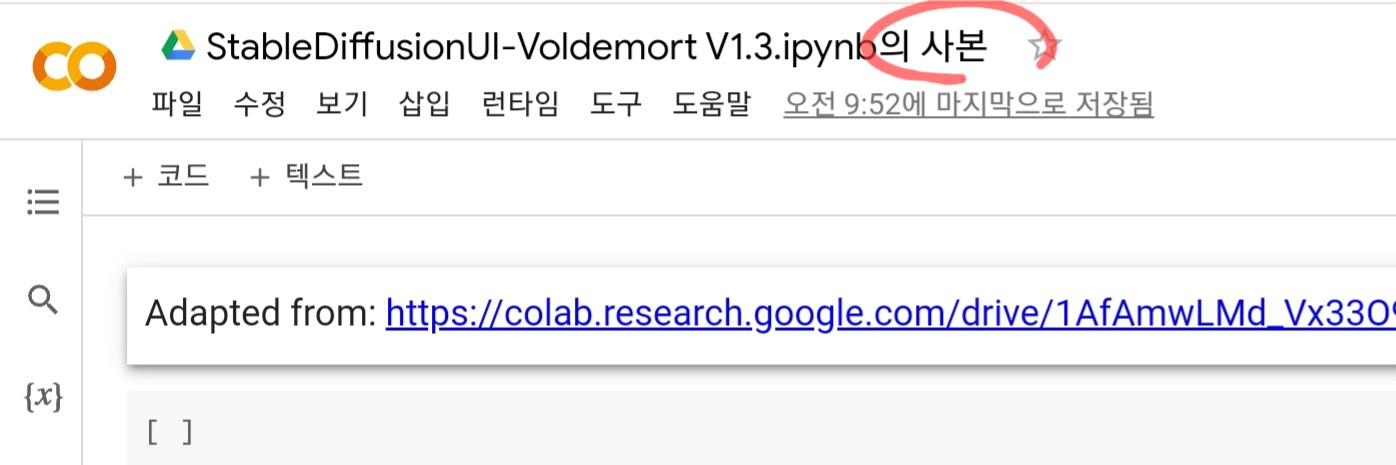
그러면 '~의 사본' 이라고 새 창이 열립니다. 여기서 작업하겠습니다.
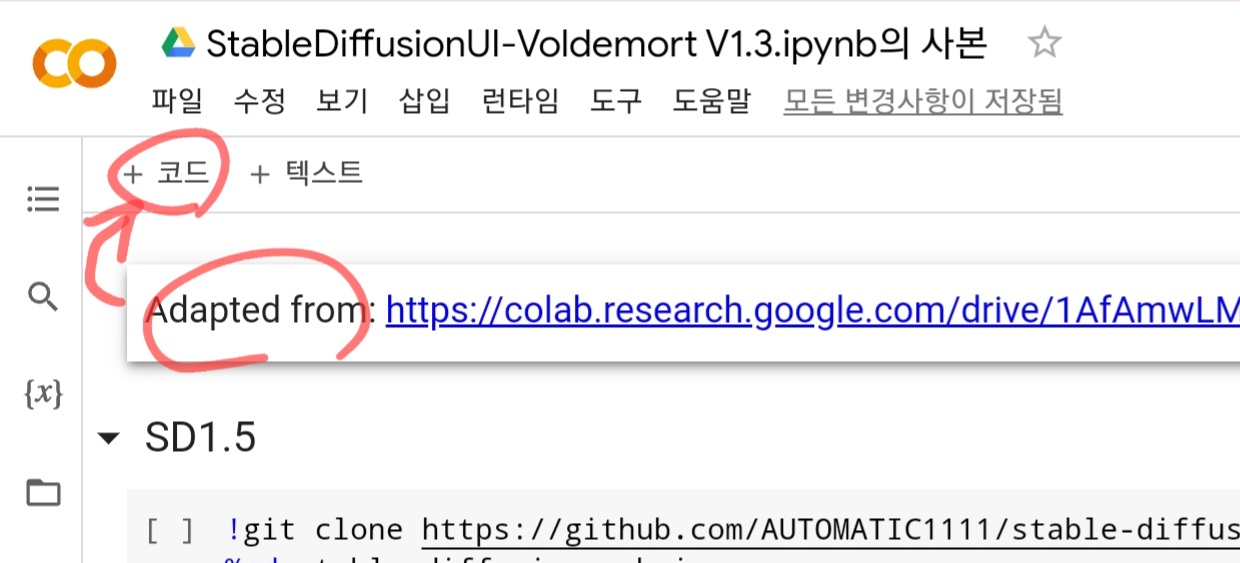
맨 위의 "Adapted from ..."라고 적힌 셀을 선택하고 상단의 "+ 코드"를 클릭합니다.
새로 생성된 셀은 다음과 같이 셀을 위아래로 움직일 수 있습니다(안 움직여도 무방함).
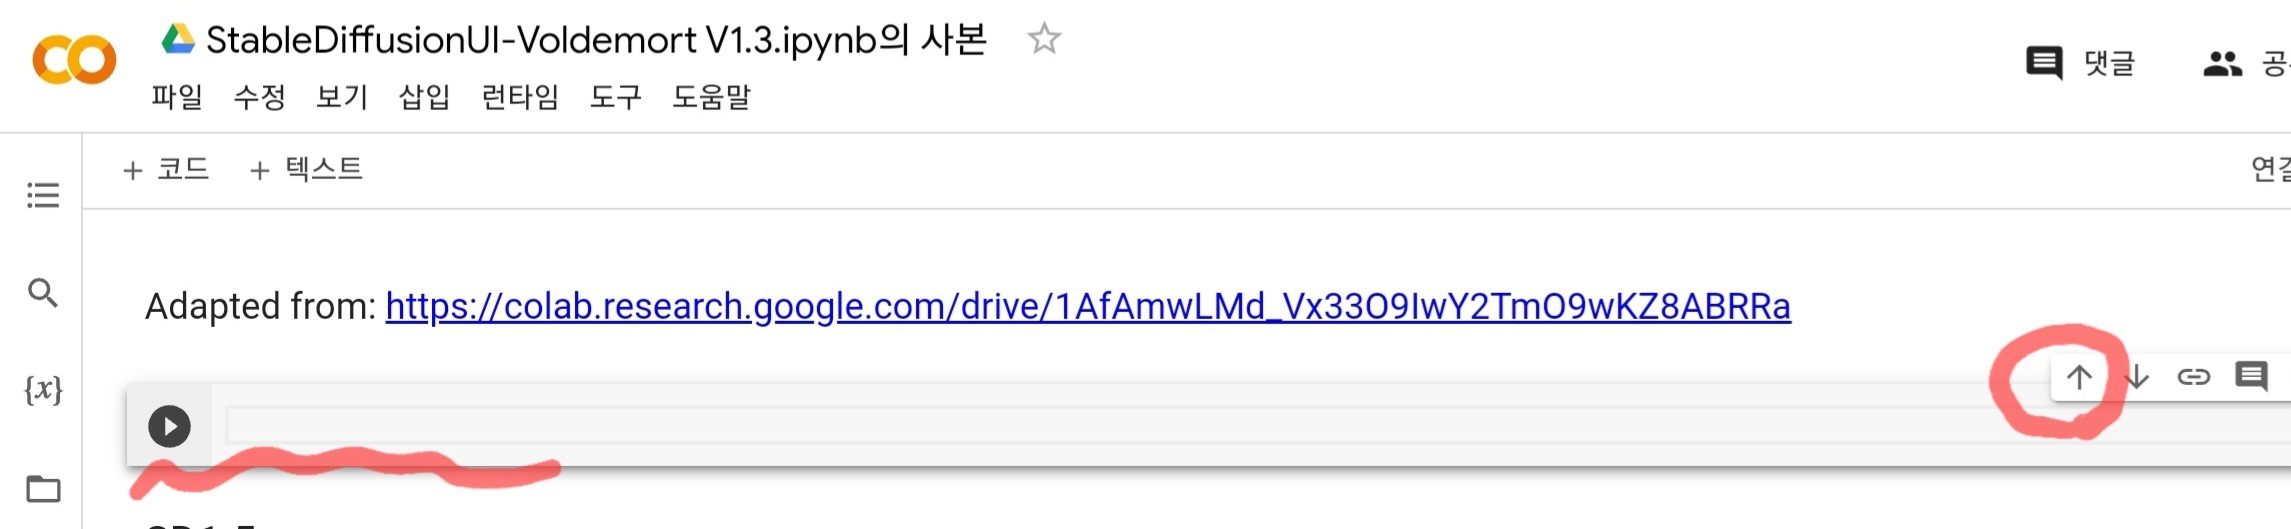
이제 아래 코드를 복사해서 넣고 실행합니다.
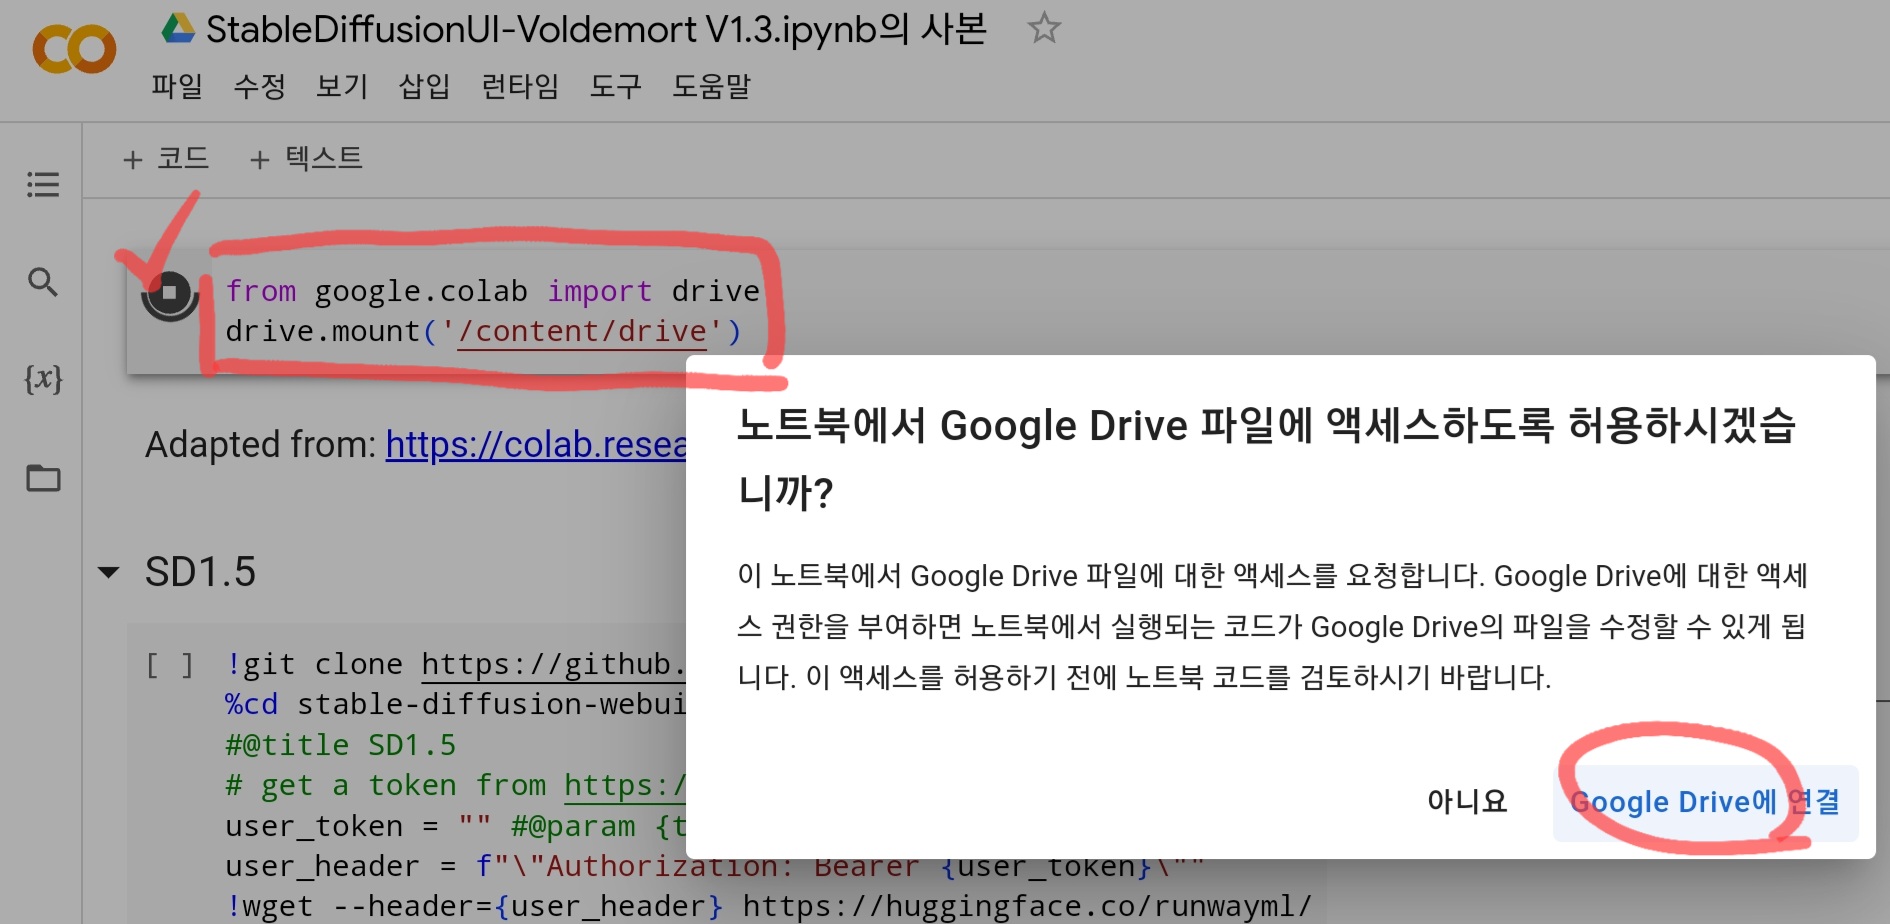
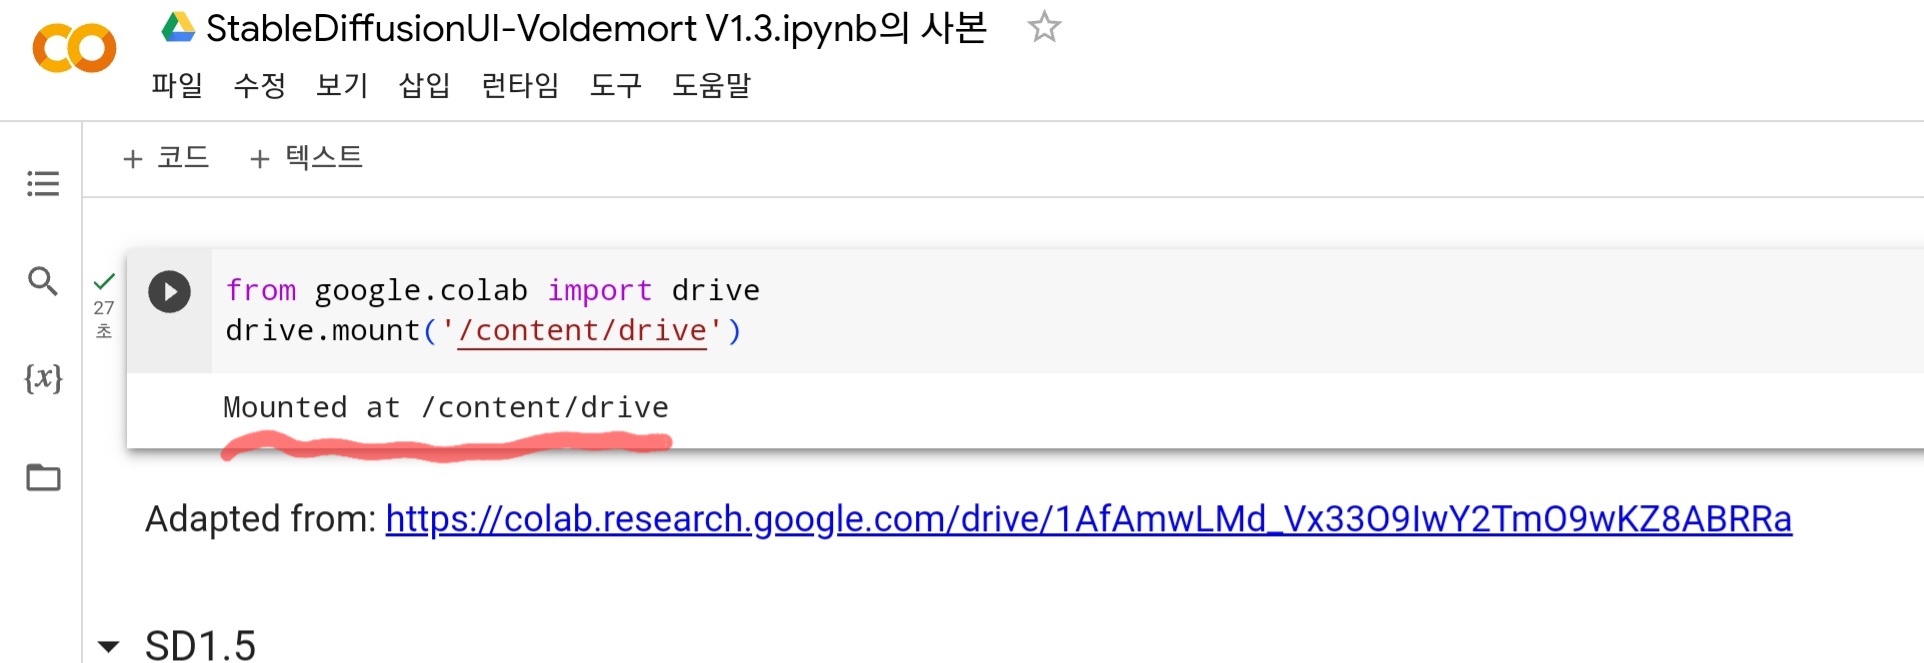
이 코드를 실행하면 Google Colaboratory에서 Google Drive 폴더를 로드할 수 있습니다.
from google.colab import drive
drive.mount('/content/drive')
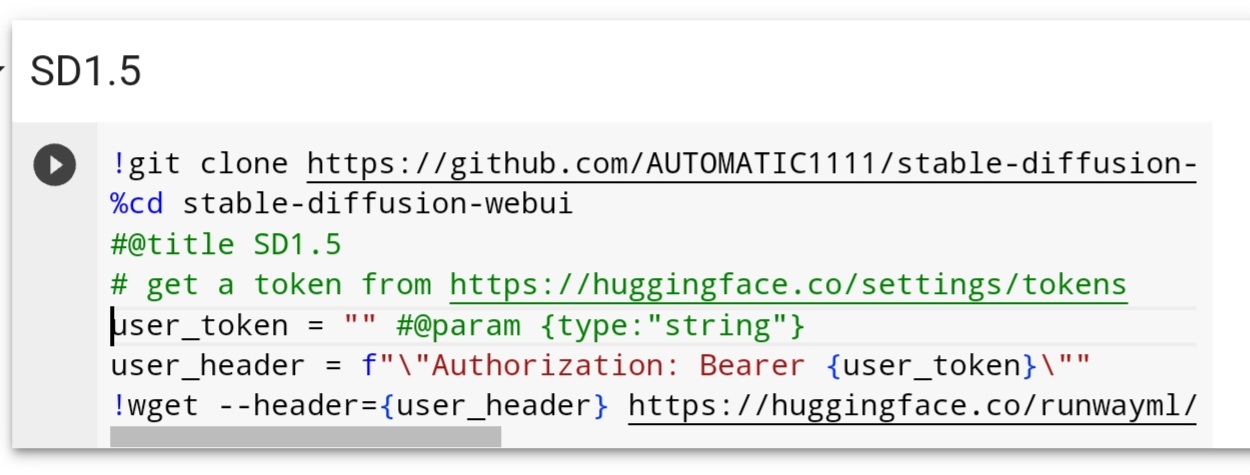
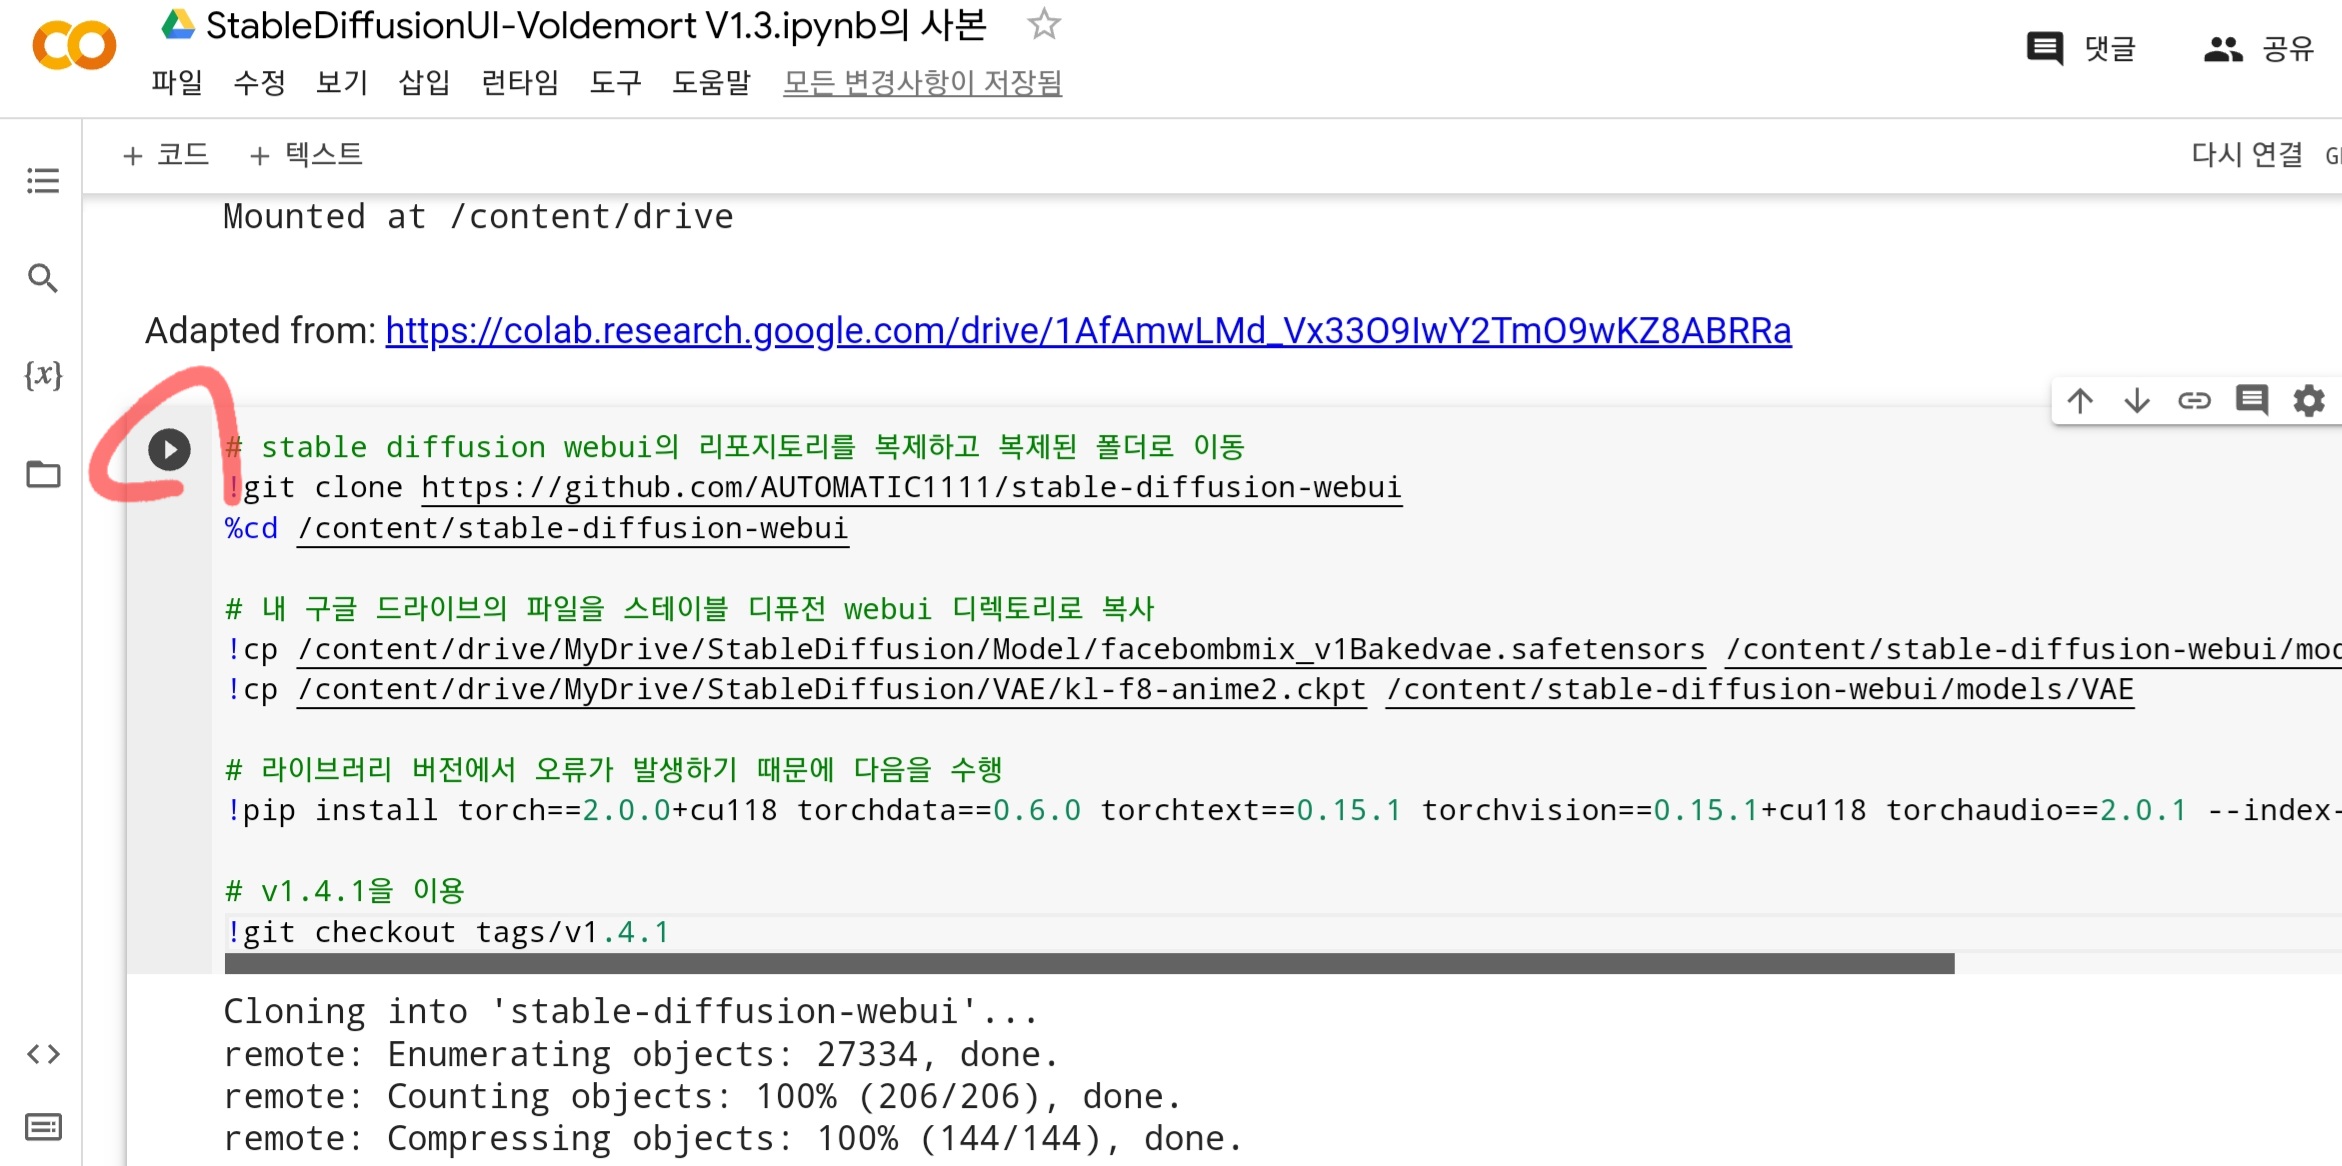
그런 다음 SD1.5 셀의 코드를 전부 삭제하고 아래의 코드를 붙여 넣습니다.
이 셀은 구글 Colab에서 WebUI를 시작하는 데 필요한 파일을 다운로드합니다(리포지토리 복제).
# stable diffusion webui의 리포지토리를 복제하고 복제된 폴더로 이동
!git clone https://github.com/AUTOMATIC1111/stable-diffusion-webui
%cd /content/stable-diffusion-webui
# 내 구글 드라이브의 파일을 스테이블 디퓨전 webui 디렉토리로 복사
!cp /content/drive/MyDrive/StableDiffusion/Model/facebombmix_v1Bakedvae.safetensors /content/stable-diffusion-webui/models/Stable-diffusion/
!cp /content/drive/MyDrive/StableDiffusion/VAE/kl-f8-anime2.ckpt /content/stable-diffusion-webui/models/VAE
# 라이브러리 버전에서 오류가 발생하기 때문에 다음을 수행
!pip install torch==2.0.0+cu118 torchdata==0.6.0 torchtext==0.15.1 torchvision==0.15.1+cu118 torchaudio==2.0.1 --index-url https://download.pytorch.org/whl/cu118
# v1.4.1을 이용
!git checkout tags/v1.4.1
변경 전
변경 후
참고로, 위에서 사용한 !cp 명령어는 copy를 의미하며,
!cp (드라이브에 저장된 파일의 경로) (모델을 저장할 폴더의 경로) 와 같이 사용합니다.
Google Drive에 저장된 모델 데이터를 구글 Colab에 복사하는 코드입니다.
덧붙여 FaceBombMix 이외의 다른 모델 데이터를 사용하고 싶은 경우, 파일명인「facebombmix_v1Bakedvae.safetensors」부분만 변경하시면 됩니다.
이제, 위의 명령어가 모두 실행 완료되면, 하단에 있는 아래 명령어를...
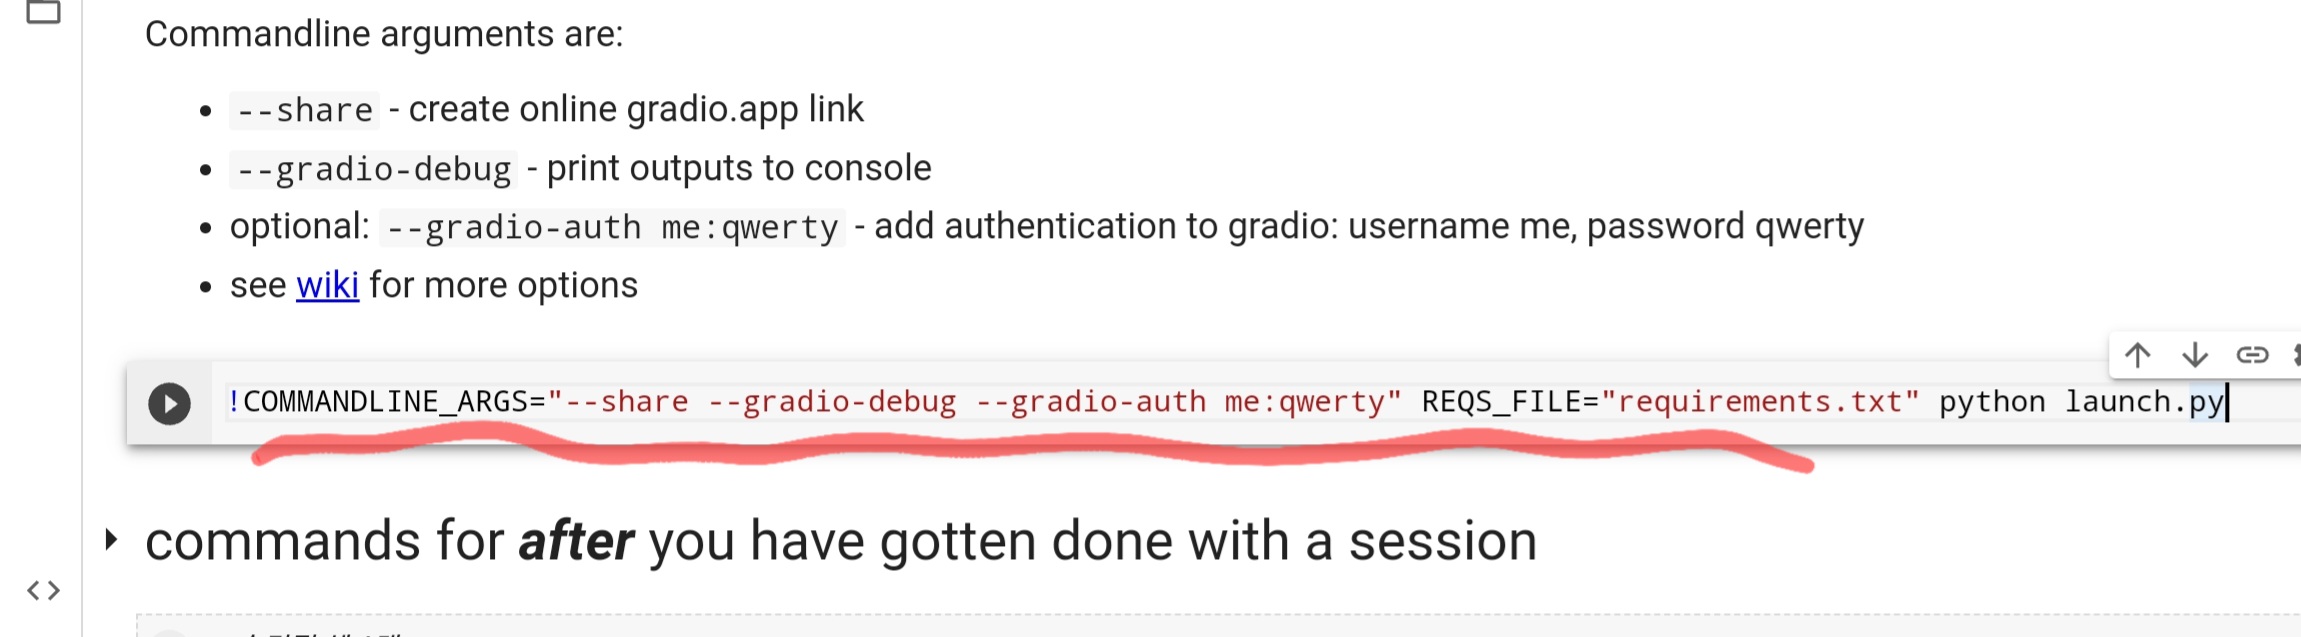
다음 명령어로 변경하고 실행합니다.
!python launch.py --share --xformers --enable-insecure-extension-access
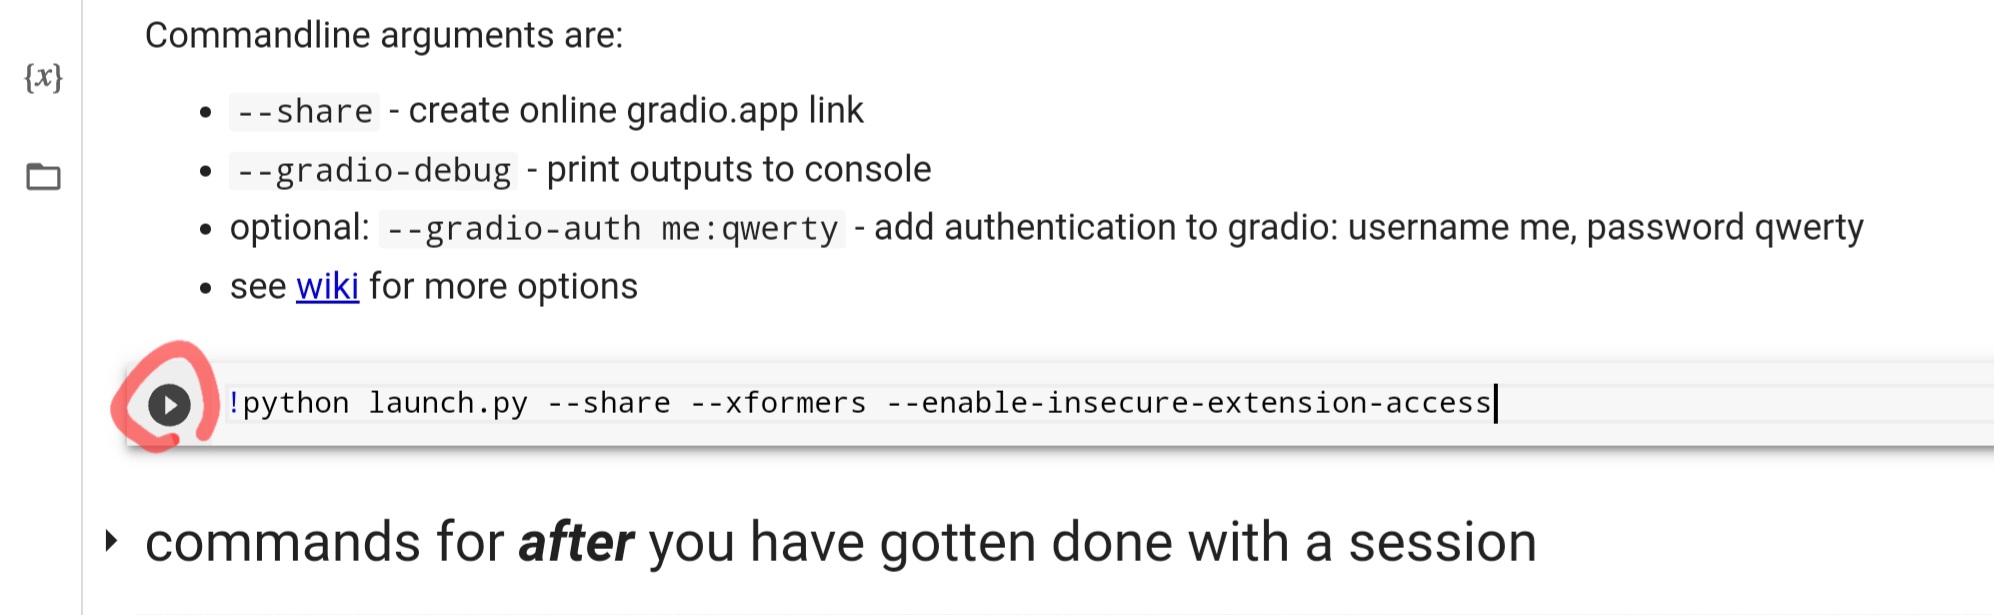
오류가 없으면 마지막에 나타나는 public URL을 클릭하여 "Stable Diffuison WebUI"를 시작합니다.
(만일 오류가 발생하면, 상단 메뉴 → 런타임 → 런타임 연결 해제 및 삭제를 누르고 처음부터 다시 반복하세요)

Stable Diffuison WebUI 가 잘 뜨네요.
종료하려면 브라우저의 × 버튼을 누르거나 탭을 닫는 대신, Google Colaboratory의 '런타임'→ '런타임 연결 해제 및 삭제'를 선택합니다.
바로 이미지를 생성해 보겠습니다.
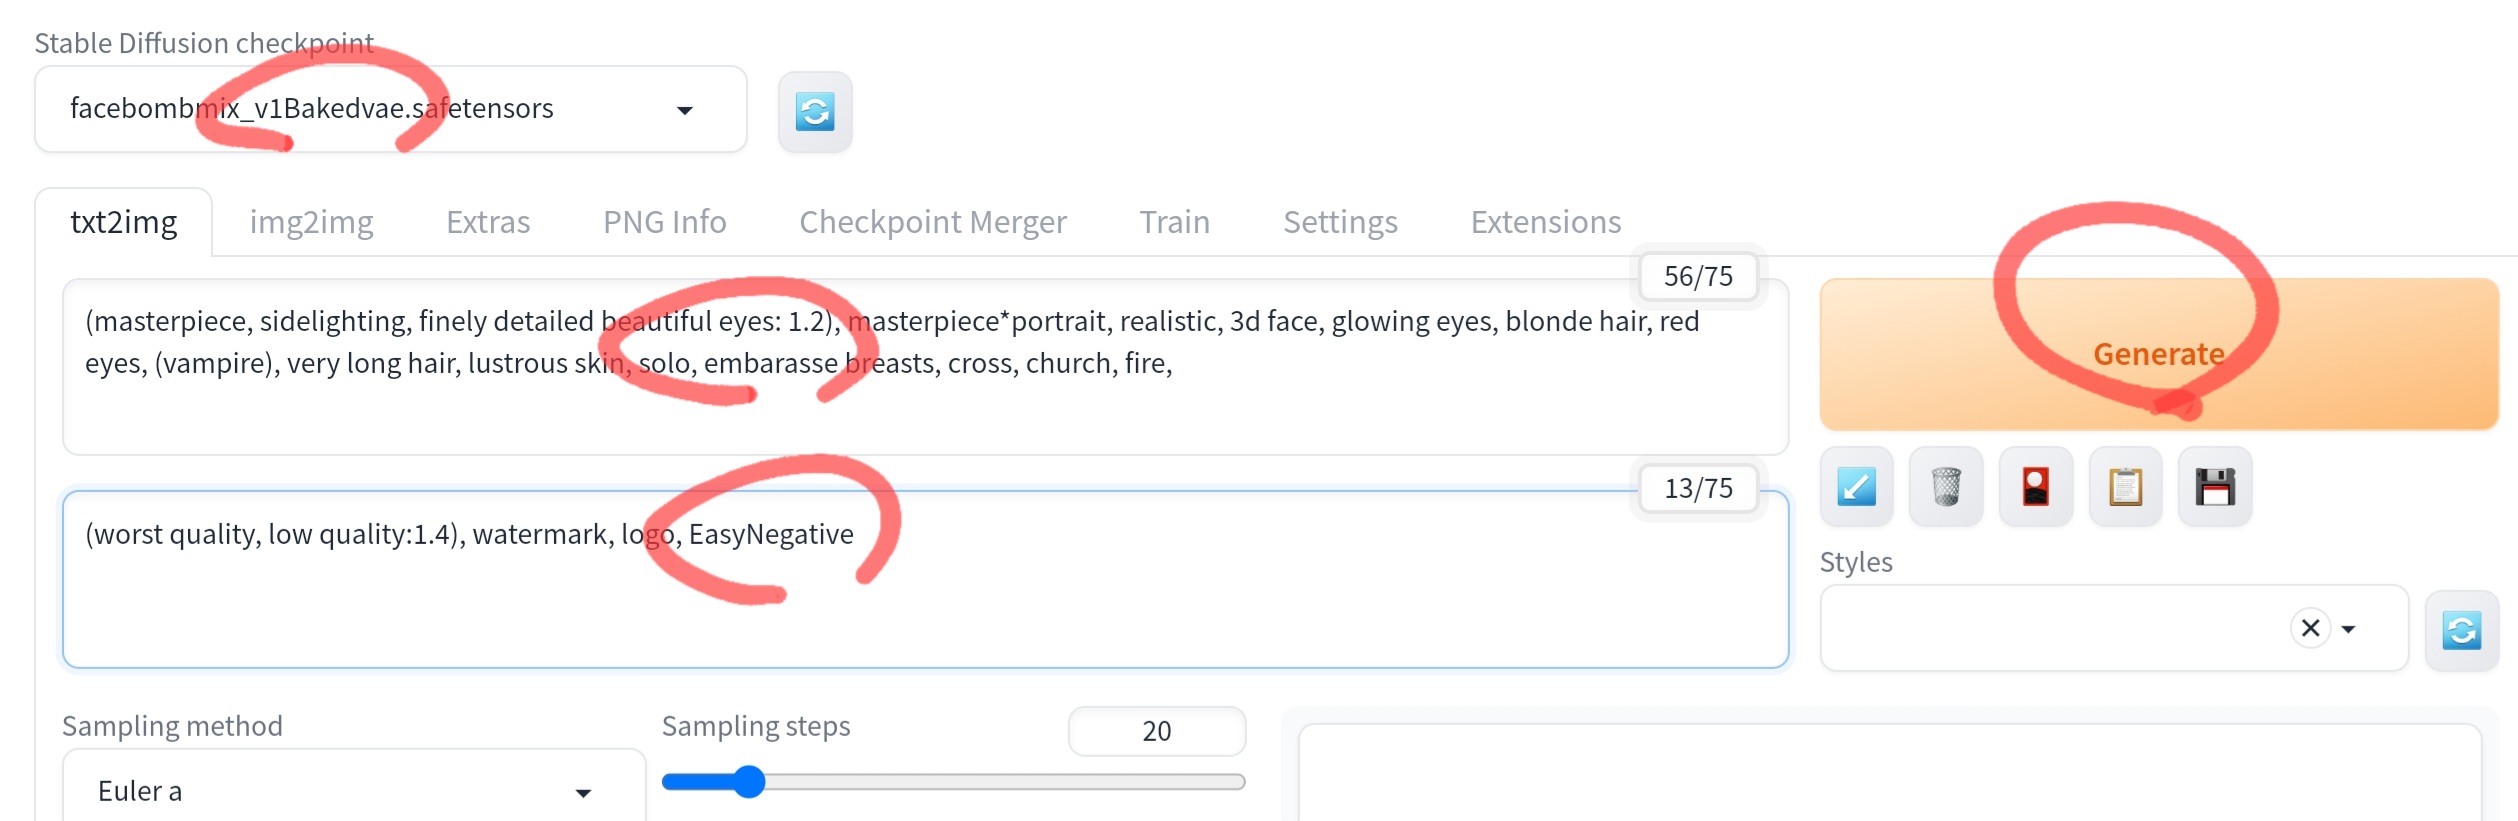
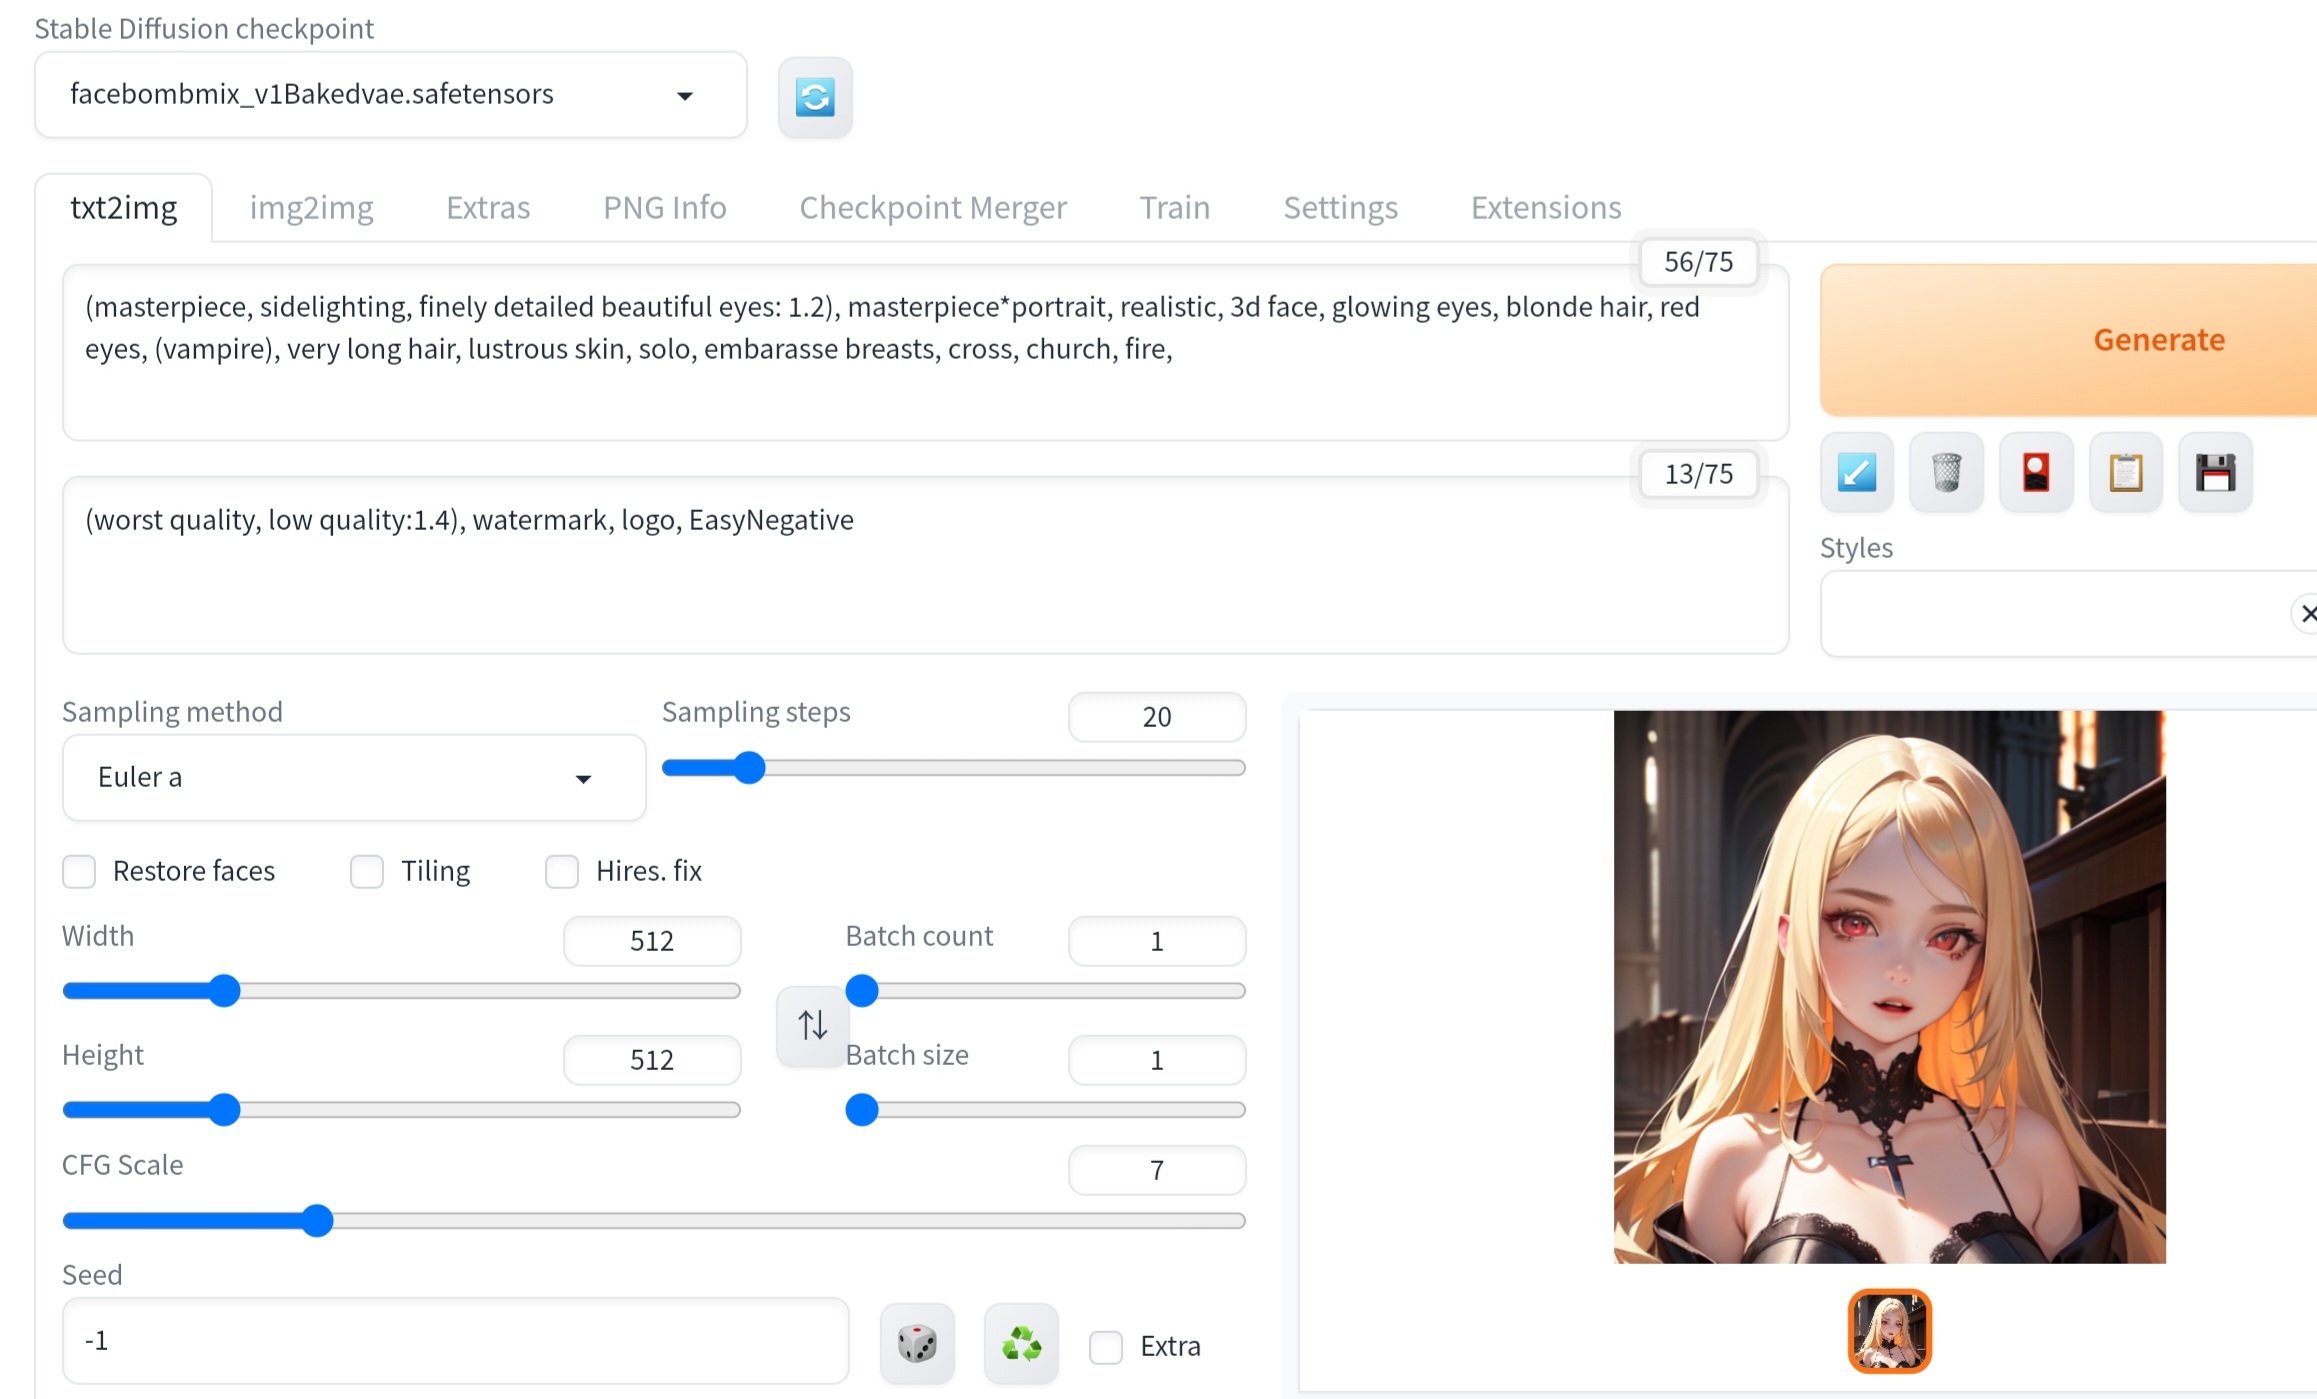
【Positive】
(masterpiece, sidelighting, finely detailed beautiful eyes: 1.2), masterpiece*portrait, realistic, 3d face, glowing eyes, blonde hair, red eyes, (vampire), very long hair, lustrous skin, solo, embarasse breasts, cross, church, fire,
【Negative】
(worst quality, low quality:1.4), watermark, logo, EasyNegative
아름다운 뱀파이어 이미지가 생성되었습니다.

FaceBombMix 프롬프트 예제
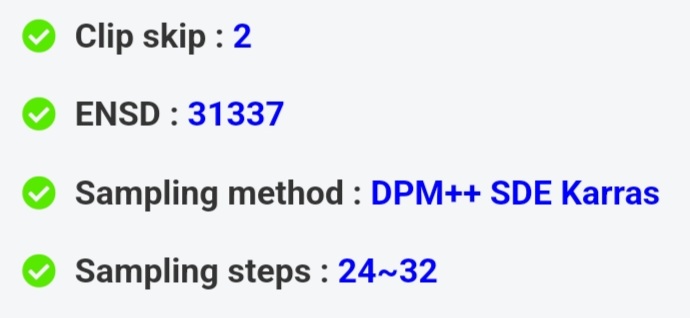
FaceBombMix의 개요란에 추천 설정이 실려 있으므로 우선은 아래의 설정대로 변경합니다.
어디에서 설정할지 모를 경우, 여기를 참고하세요.
【프롬프트1】인어

【Positive】
(masterpiece, sidelighting, finely detailed beautiful eyes: 1.2), masterpiece*portrait, realistic, 3d face, glowing eyes, silver hair, blue eyes, (mermaid), very long hair, lustrous skin, solo, embarasse breasts, wet, ocean
【Negative】
(worst quality, low quality:1.4), watermark, logo
【프롬프트 2】 서큐버스


【Positive】
(masterpiece, sidelighting, finely detailed beautiful eyes: 1.2), masterpiece*portrait, realistic, 3d face, glowing eyes, cleavage, upper body, red hair, blue eyes, ((succubus)), very long hair skin, solo, embarassed, medium breasts, bedroom, beautiful lightning
【Negative】
(worst quality, low quality:1.4), watermark, logo
요약
이상 「Stable Diffusion」으로, 「AUTOMATIC1111」가 만든 「maintained by Akaibu」를 사용해, Google Colaboratory상에서 자신이 좋아하는 모델 데이터를 사용하는 방법을 소개하였습니다. 이 방법을 사용하면 아마도 대부분의 모델을 Google 코랩에서 사용할 수 있을 것입니다.
다음번엔 LoRA 사용법을 알아보겠습니다.
다음에 계속...
'AI · 인공지능 > 이미지 생성 AI' 카테고리의 다른 글
| 방의 사진과 프롬프트로 원하는 가구를 생성해주는 「Fill 3D」가 등장 (0) | 2023.10.04 |
|---|---|
| 여러 장의 실패 샷에서 베스트 샷을 생성할 수 있는 AI 「RealFill」 (0) | 2023.10.04 |
| AI 생성 추상화 등 3만 장을 무료로 공개한 dasyn (0) | 2023.09.25 |
| ChatGPT에 통합되어 채팅하며 이미지를 생성할 수 있는 AI「DALL-E 3」를 OpenAI가 발표 (1) | 2023.09.22 |
| [2023년판] Stable Diffusion WebUI로 AI 미소녀 만드는 법「ChilloutMix」 (1) | 2023.09.12 |
| AI에 의한 학습을 방해하는 적대적 노이즈를 이미지로부터 제거하는 「AdverseCleaner」리뷰 (4) | 2023.09.04 |
| Google이 'AI로 생성한 이미지'에 전자 워터마크를 넣어 페이크 확산을 방지하는 툴 'SynthID' 발표 (1) | 2023.08.31 |
| 영상을 애니화 하거나 피사체를 바꾸고 잘린 부분을 보완하는 AI 「MagicEdit」가 등장 (0) | 2023.08.31 |


